How to Use Google Search Console Like a Pro

Google Search Console is an essential tool for any digital marketer or website owner.

Whether you’re managing a blog, an eCommerce site, or a corporate page, leveraging the full potential of Google Search Console (GSC) can dramatically enhance your site’s SEO performance.

You can get a report on Discover traffic from Google Search Console. This report will tell you how often your site shows up in users’ Discover, how much traffic you get, and how your content does in Discover compared to regular search results.

You can also find out about Search performance, Index coverage, Mobile usability, Security problems, and Crawl errors from Google Search Console.

In 2024 or beyond, mastering this tool will be more important than ever.

This comprehensive guide will walk you through the most advanced features and show you how to use Google Search Console like a pro.

Adding Your Website to Google Search Console

Before you can start leveraging Google Search Console (GSC), the first step is to add your website to the platform.

This is a straightforward process but crucial for enabling Google to track your site’s data.

Steps to Add Your Website to Google Search Console
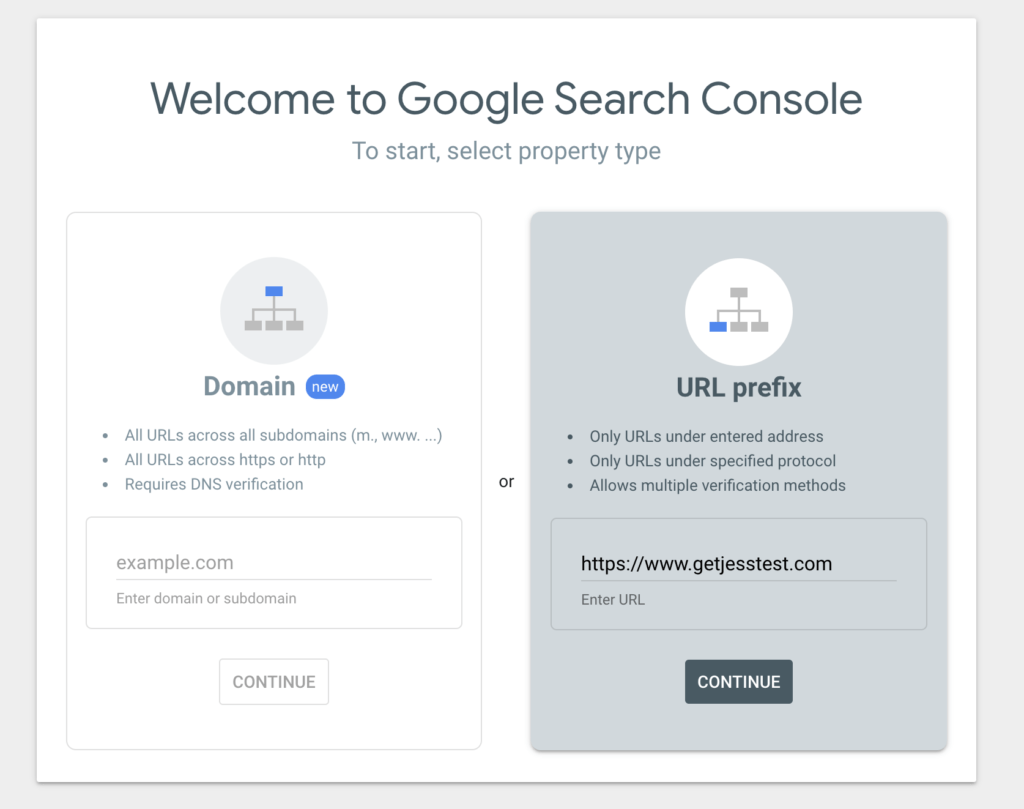
Steps to Add Your Website to Google Search Console
  1. Sign in to Google Search Console: Head over to the official GSC platform and sign in using your Google account.

  2. Add a Property: Once you’re logged in, click on the Add Property button. You’ll have two options: enter your domain name or use the URL prefix. We recommend using the domain property option, as it covers all variations of your site (e.g., www and non-www, HTTP and HTTPS).

  3. Verify Ownership: Google offers several verification methods:

    • HTML Tag: Add a meta tag to your site’s homepage.

    • Google Analytics: If you’re already using Google Analytics, you can verify ownership through this integration.

    • Domain Name Provider: This method verifies ownership through your domain provider (like GoDaddy or Namecheap). Choose the method that works best for you, and complete the process.

Once your website is verified, you’ll have full access to all the data and features Google Search Console offers.

Setting Up Owners, Users, and Permissions

Managing owners, users, and permissions within Google Search Console is essential, especially if multiple team members are involved in maintaining your website.

GSC allows you to control access and assign different levels of permissions to ensure the right people have the correct level of control.

Types of Permissions in Google Search Console

  1. Owner: An owner has full control over the property in GSC. They can add or remove users, adjust settings, and access all data.

  2. Full User: A full user can view all data and take most actions within the console, but they cannot manage other users or settings.

  3. Restricted User: A restricted user has read-only access. They can view most of the data, but they cannot make any changes to the property or its settings.

How to Set Up Users and Permissions

  1. Go to the Settings section in your Search Console dashboard.

  2. Click on Users and Permissions.”

  3. Add new users by entering their email address and assigning them a role (either full or restricted access).

  4. For owners, this must be done via verification—additional ownership verification methods can be assigned.

This setup allows you to ensure your SEO team, web developers, or stakeholders have the appropriate access to make the necessary updates and changes.

Submitting a Sitemap

One of the first things you should do after adding your website to Google Search Console is submit your sitemap.

A sitemap is essentially a roadmap for search engines to understand your website’s structure, helping them crawl and index your pages more efficiently.

How to Submit Your Sitemap in Google Search Console

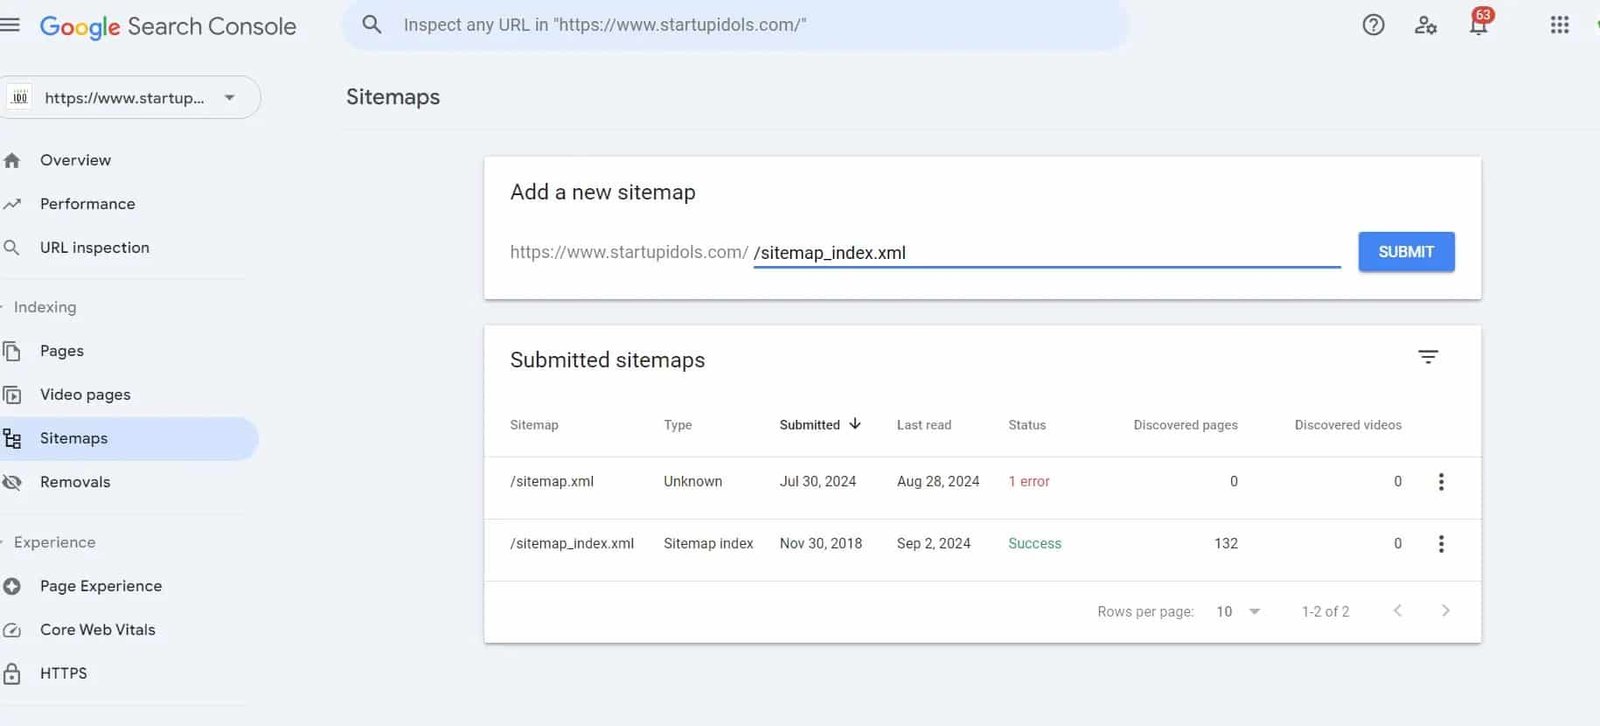
  1. Navigate to the Sitemaps section in your GSC dashboard.

  2. In theAdd a new sitemapfield, enter the URL of your sitemap (usually www.yourdomain.com/sitemap.xml).

  3. Click Submit.”

Submitting a sitemap ensures that Google can crawl your site more effectively, allowing all of your important pages to be indexed faster and improving your chances of ranking higher in search results.

Best Practices for Sitemaps

  • Update your sitemap regularly: If you frequently add new content or pages to your website, make sure your sitemap is updated to reflect these changes.

  • Submit multiple sitemaps if necessary: For large websites with thousands of pages, it’s a good idea to break your sitemap into smaller chunks. GSC allows you to submit multiple sitemaps for better crawlability.

Understanding Dimensions and Metrics

Dimensions in GSC

Dimensions are categories that you can use to break down the performance data. Some of the most useful dimensions include:

  • Queries: The search terms users typed in to find your site.

  • Pages: The specific URLs on your website that appeared in search results.

  • Countries: Data segmented by user location.

  • Devices: How users accessed your site, whether from desktop, mobile, or tablet.

By analyzing both metrics and dimensions, you can gain detailed insights into which pages and keywords are driving the most traffic and adjust your SEO strategy accordingly.

Key Metrics in Google Search Console
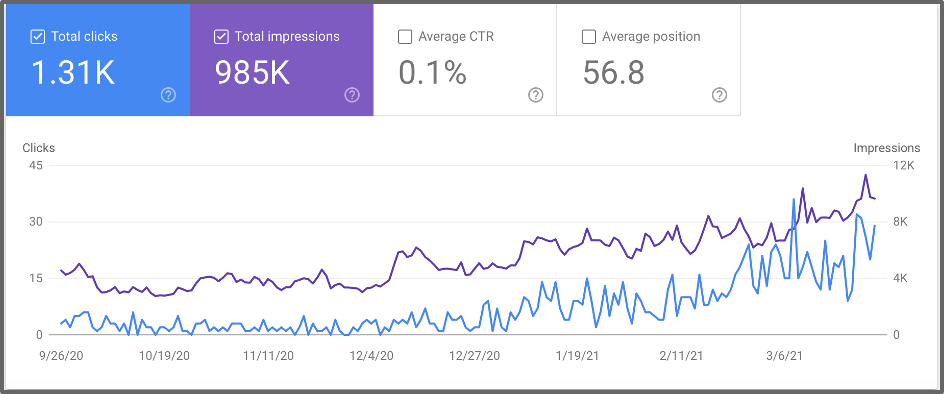
Key Metrics in Google Search Console
  1. Clicks: The number of times a user clicked on your site from Google’s search results.

  2. Impressions: How often your site appeared in the search results, regardless of whether it was clicked.

  3. Average CTR (Click-Through Rate): This shows the percentage of impressions that resulted in a click. It’s a good indicator of how compelling your title tags and meta descriptions are.

  4. Average Position: The average ranking position of your site for specific keywords. This is a crucial metric to track as you work on improving your site’s SEO.

Adding Filters for Advanced Analysis

Using filters in Google Search Console allows you to zero in on specific data and analyze your performance more thoroughly.

Filters help you refine your reports to focus on key metrics like traffic from a particular country, device, or search query.

How to Add Filters in Google Search Console

  1. Open the Performance Report.

  2. At the top, you’ll find various filter options, such as Query, Page, Country, and Device.

  3. Select the dimension you want to filter by, and GSC will adjust the report to show data based on that filter.

Useful Filters to Consider

  1. Device Filter: Analyze how your site performs across different devices. This can help you spot issues with mobile usability or areas where desktop traffic is outperforming mobile.

  2. Query Filter: Focus on specific queries to understand which search terms are bringing in the most traffic. This is particularly helpful when optimizing for specific keywords.

  3. Date Range Filter: Use this filter to compare performance over different time periods. For example, you can analyze the impact of recent SEO changes by comparing the current month’s data to the previous one.

Best Practices for Setting Up Search Console

Make sure that every version of your site (with and without www, as well as http and https) is added to GSC.

You can consolidate all the data into one view by using domain properties.

This ensures you have a complete picture of how your site performs across all variations.

Key Metrics You Should Focus On

  • Clicks: The number of times users clicked through from search results to your website.

  • Impressions: How many times your website appeared in the search results.

  • Average CTR (Click-Through Rate): The percentage of impressions that resulted in a click.

  • Average Position: Your website’s average ranking position for all queries.

By analyzing these metrics, you can gain insights into which keywords are driving traffic and identify areas where you can optimize further.

How to Leverage Keyword Data

Use the Queries tab to discover which search terms are bringing users to your site.

Sort by clicks to identify your most valuable keywords and look for terms with high impressions but low click-through rates.

These are often opportunities where tweaking your meta descriptions or title tags could yield significant traffic improvements.

Coverage Report: The Key to Identifying Issues

The Coverage Report in GSC will show you which of your URLs are indexed and which are not. Here’s what to focus on:

  • Errors: Pages that Google attempted to index but encountered a problem.

  • Valid with Warnings: Pages that are indexed but may have issues worth investigating.

  • Excluded: Pages that were intentionally or unintentionally excluded from indexing.

Fixing Common Indexing Errors

  1. 404 Errors (Not Found): If Google can’t find a page on your site, it returns a 404 error. These can damage your SEO. Regularly check your GSC for 404s, and redirect these pages to relevant content using 301 redirects.

  2. CrawledCurrently Not Indexed: This issue usually occurs when Google has visited the page but decided not to index it. You might need to update your content, improve internal linking, or address duplicate content issues.

  3. Submitted URL Blocked by Robots.txt: If you accidentally block important pages in your robots.txt file, they won’t be indexed. Double-check that critical URLs aren’t being blocked.

How to Improve Core Web Vitals in GSC

Google Search Console provides a Core Web Vitals Report, which shows you where your pages are performing well and where improvements are needed.

Focus on fixing pages withPoororNeeds Improvementlabels. Consider lazy-loading images, optimizing JavaScript execution, and minimizing CSS to enhance your page speed.

Optimizing Your Website for Core Web Vitals

Core Web Vitals continue to play a significant role in how Google ranks your site.

These are three specific performance metrics that measure user experience:

  1. Largest Contentful Paint (LCP): This measures how long it takes for the largest content element on your page to load. Aim for under 2.5 seconds.

  2. First Input Delay (FID): Measures the time it takes for your page to become interactive. The ideal is less than 100ms.

  3. Cumulative Layout Shift (CLS): Measures the visual stability of your page. Keep it below 0.1 to avoid ranking penalties.

Using URL Inspection Tool for Troubleshooting

The URL Inspection Tool in Google Search Console is a critical feature for diagnosing specific page issues.

Whether you’ve made updates to a page or want to check its mobile-friendliness, this tool gives you real-time insights.

How to Use It Like a Pro

  1. Test for Live Issues: You can see whether a specific URL is currently being indexed and how Google sees it. This helps you catch any potential SEO issues before they affect your ranking.

  2. Submit for Reindexing: If you’ve made significant updates to a page, use the URL Inspection Tool to request reindexing. This forces Google to revisit your page more quickly than if you wait for its regular crawl.

  3. Mobile Usability Testing: Since Google has moved to mobile-first indexing, it’s crucial that your site works flawlessly on mobile devices. Use the tool to check for any mobile usability issues.

Tracking Backlinks in Google Search Console

Backlinks remain one of the most important ranking factors. Google Search Console allows you to monitor which sites are linking to your pages, the anchor text used, and the top linked pages.

How to Make the Most of Backlink Data

  1. Identify Your Most Linked Pages: These pages likely contain valuable content, making them ideal candidates for further SEO optimization or internal linking.

  2. Review Anchor Text: Check to ensure that the anchor text pointing to your site is relevant and not spammy. Google may penalize links with over-optimized or irrelevant anchor text.

  3. Disavowing Toxic Links: If you notice suspicious or spammy backlinks in your report, consider disavowing them using Google’s Disavow Tool. This will prevent them from negatively affecting your rankings.

Want to Create Profit-Pumping Niche Websites In Just 180 Seconds?

People are making $6,562+ per month with their niche sites (here’s how you can create your own in just minutes!)

Utilizing the New Features

Google is constantly improving its tools, and 2024 has introduced a few exciting new features to Search Console that can enhance your SEO strategy.

  1. Performance by Device and Location: This new filter lets you drill down into performance data based on the device (mobile, tablet, desktop) and location. Use this data to target specific devices or regions with customized content.

  2. Regex Filters in Performance Reports: You can now use regular expressions (regex) to perform advanced filtering of queries. This is especially useful if you want to track a group of similar queries or exclude certain terms from your data.

  3. Content Ideas Based on Search Trends: GSC now offers AI-powered suggestions for content topics based on trending queries. Use this to align your content strategy with user intent and attract more organic traffic.

Google Search Console Reports and Features

Now, let’s explore the essential Google Search Console Reports that provide in-depth insights into your site’s performance, technical issues, and opportunities for optimization.

Performance Report

The Performance Report shows how your site performs in Google Search.

It includes metrics like clicks, impressions, CTR, and average position, broken down by queries, pages, countries, and devices.

How to Use the Performance Report:

  • Track which queries bring the most traffic.
  • Analyze which pages have high impressions but low CTR and optimize them.
  • Compare how your site performs across devices and countries.

URL Inspection Tool

The URL Inspection Tool allows you to analyze specific pages on your website and see if Google correctly indexes them.

Key Features of URL Inspection Tool:

  • Indexing Status: See whether a URL is indexed or not.
  • Mobile Usability: Check if the page is mobile-friendly.
  • Coverage Issues: Identify and fix issues preventing the page from being crawled or indexed.

Page Indexing Report

The Page Indexing Report helps you understand which pages of your website are indexed and which are not, along with reasons why certain pages may not be indexed.

How to Use the Page Indexing Report:

  • Monitor how many pages are indexed and if any important pages are missing.
  • Investigate reasons for non-indexed pages, such as noindex tags, blocked resources, or canonicalization issues.

Sitemaps Report

The Sitemaps Report allows you to monitor the status of the sitemaps you’ve submitted to Google.

How to Use the Sitemaps Report:

  • Check for errors or warnings that might prevent your sitemap from being crawled.
  • Ensure that all important sections of your website are represented in your sitemap.

Page Experience Report

The Page Experience Report evaluates how users perceive the experience of interacting with your web pages. This report is crucial for monitoring Core Web Vitals.

Metrics in the Page Experience Report:

  • Largest Contentful Paint (LCP): Measures loading performance.
  • First Input Delay (FID): Measures interactivity.
  • Cumulative Layout Shift (CLS): Measures visual stability.

Enhancements Report

The Enhancements Report focuses on structured data and other improvements that can enhance your site’s performance in search results.

Key Features:

  • Rich Results: Check if your structured data is correctly implemented to qualify for rich results in search.
  • Identify and fix issues related to structured data, such as errors in schema markup.

Manual Actions Report

If your website violates Google’s guidelines, it may be subject to a manual action. The Manual Actions Report shows if your site has been penalized and why.

What to Do if You Receive a Manual Action:

  • Address the specific issue flagged by Google, such as unnatural links or thin content.
  • Once resolved, submit a reconsideration request through GSC to have the penalty removed.

Links Report

The Links Report provides insights into your site’s internal and external linking structure.

How to Use the Links Report:

  • Monitor external links to ensure your site is receiving quality backlinks.
  • Analyze internal links to ensure important pages are linked effectively within your website.

Shopping Report

For eCommerce websites, the Shopping Report helps track the performance of your product pages in Google Shopping.

Key Features:

  • Identify issues with product data that might prevent items from appearing in Google Shopping.
  • Monitor clicks and impressions from product listings to optimize for better performance.

AMP Report

The AMP (Accelerated Mobile Pages) Report monitors any issues related to your AMP pages, ensuring they load quickly and are mobile-friendly.

How to Use the AMP Report:

  • Check for any AMP-related errors or warnings that might affect your pages’ mobile performance.
  • Address any issues to ensure your AMP pages provide a fast, mobile-optimized experience for users.

Introducing MAT1 Marketing & Affiliate Training!

A Complete Online Digital Library of Courses To Help You Build Sustainable Predictable Income You Can Rely On Month After Month!

Get Access

Conclusion: How to Use Google Search Console

Google Search Console is a powerful tool that provides essential insights into your website’s performance in search results.

By adding your website properly, setting up users and permissions, submitting a sitemap, understanding key metrics, and using filters for advanced analysis, you can unlock this platform’s full potential.

These best practices will help you stay ahead of the competition and continuously improve your site’s SEO performance in 2024.

Mastering Google Analytics in 2024: Essential Tips, Tricks, and Techniques for Enhanced Insights

Want to unlock valuable insights from your website traffic? Learning how to use Google Analytics is the key! This powerful tool allows you to track visitor behavior, measure performance, and make data-driven decisions to grow your business.

Understanding how well your website is doing is more important than ever in today’s digital world, and Google Analytics is still the best tool for actionable information in 2024.

With new updates and improved features, it gives you tools that no other platform does to track visitor behavior, measure interest, and make your marketing more effective.

Learning how to use Google Analytics is essential if you want to stay competitive in a world that is becoming increasingly data-driven.

This complete guide will show you all the essential Google Analytics tips, tricks, and techniques you need to use them to their fullest this year.

You’ll learn how to get useful information that helps your business grow, from setting up your account to using advanced tools like Google Analytics 4 (GA4) and eCommerce tracking.

Read on to learn why Google Analytics is still an important tool for businesses of all sizes and how you can use it to its fullest to reach your goals.

Table of Contents

Getting Started: How to Use Google Analytics

Getting Started How to Use Google Analytics

Introduction to Google Analytics

What is Google Analytics?

Google Analytics is a powerful web analytics tool that provides insights into how users interact with your website.

By tracking data such as traffic sources, user behavior, and conversions, it helps businesses make informed decisions to optimize their digital strategies.

With its ability to measure everything from page views to complex conversion paths, Google Analytics offers a comprehensive way to monitor and improve website performance.

Key Features and Updates in 2024

In 2024, Google Analytics continues to evolve, with Google Analytics 4 (GA4) becoming the default version, offering a more advanced and flexible approach to data analysis.

Key features include enhanced event tracking, deeper audience segmentation, and AI-powered predictive analytics.

GA4 focuses on a user-centric data model, which provides a better understanding of cross-device behavior.

Additionally, privacy updates aligned with GDPR and CCPA compliance have been refined to ensure better control over user data, making it both robust and compliant with the latest regulations.

Setting Up Google Analytics

Setting Up Google Analytics

Creating a Google Analytics Account

To start using Google Analytics, the first step is creating an account.

Visit the Google Analytics website, sign in with your Google account, and follow the prompts to set up a new account. You’ll need to provide basic details such as your website name, URL, industry category, and reporting time zone.

Once your account is created, you’ll receive a unique tracking ID, which will allow Google Analytics to collect data from your site.

Installing Google Analytics on Your Website

Once you’ve created your account, you need to install Google Analytics on your website. This typically involves adding a JavaScript tracking code to the header of your website’s pages.

Most website platforms, such as WordPress, have plugins that simplify this process. If you’re using Google Tag Manager, you can also implement Google Analytics by setting up a new tag.

Ensuring the tracking code is properly installed is crucial to capturing accurate data.

Setting Up Goals and Conversion Tracking

After installation, it’s essential to set up goals to track key actions users take on your website, such as form submissions, purchases, or downloads.

In Google Analytics, you can define different types of goals: destination (e.g., landing on a thank-you page), duration (e.g., time spent on site), pages/screens per session, and event goals (e.g., clicking a specific button).

Conversion tracking allows you to measure how well your site meets these objectives, helping you to optimize your marketing efforts and user experience based on real-time data.

This setup is crucial for obtaining actionable insights that drive business growth, making it the foundation for mastering Google Analytics in 2024.
Understanding the Google Analytics Interface

Understanding the Google Analytics Interface

Navigating the Dashboard

Overview of the Dashboard Layout

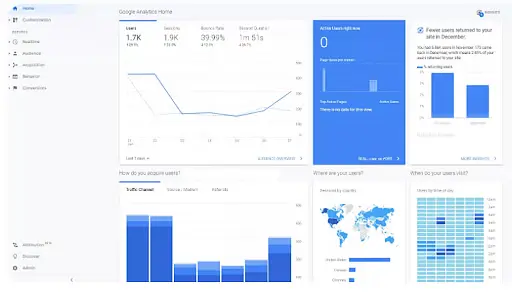
The Google Analytics dashboard serves as the central hub for tracking and analyzing your website’s data.

Upon logging in, you’ll find a user-friendly layout that provides quick access to essential metrics, including traffic data, user behavior, and conversions.

The left-hand sidebar contains the primary navigation menu, which houses different sections such as Real-Time, Audience, Acquisition, Behavior, and Conversion reports.

At the top of the dashboard, you’ll find key metrics like the number of users, session duration, bounce rate, and conversions, providing a snapshot of your website’s performance.

Customizing Your Dashboard for Quick Access

One of the strengths of Google Analytics is its customization capabilities. You can tailor your dashboard to prioritize the metrics most relevant to your business.

You can streamline your workflow by adding widgets for specific reports, setting up custom segments, or creating shortcuts to frequently accessed data.

Customizing the dashboard saves time and ensures that the most important data is at your fingertips, allowing you to monitor performance and quickly respond to trends in real-time.

Key Reports and Their Functions

Real-Time Reports

Real-Time reports allow you to monitor user activity on your website as it happens.

This section provides immediate insights into active users, their location, the pages they are viewing, and the traffic sources driving them to your site.

Real-Time reports are particularly useful for tracking the effectiveness of live campaigns, content releases, or product launches, giving you a live pulse on user engagement.

Audience Reports

Audience Reports offer a deep dive into who your users are, providing demographic data such as age, gender, interests, geographic location, and language.

These reports help you understand your audience’s makeup and behavior patterns, allowing you to tailor your content and marketing strategies to better resonate with your visitors.

Audience segmentation is key to delivering personalized experiences and improving user retention.

Acquisition Reports

Acquisition Reports focus on how users arrive at your website. These reports break down traffic sources into categories such as direct, organic search, paid ads, and referrals.

By understanding where your visitors come from, you can evaluate the effectiveness of your marketing efforts and identify which channels drive the most valuable traffic.

This is essential for optimizing your campaigns and increasing your return on investment (ROI).

Behavior Reports

Behavior Reports analyze how users interact with your website’s content. You can track page views, unique page views, bounce rate, and the average time spent on each page.

These reports are critical for identifying your most popular content and understanding how users navigate through your site.

Additionally, Behavior Reports help pinpoint areas where users may drop off, allowing you to improve the user experience and retain more visitors.

Conversion Reports

Conversion Reports focus on tracking the goals and objectives you’ve set for your website, such as sales, form submissions, or other key actions.

These reports provide insights into your conversion rates, helping you understand how well your site is meeting its business objectives.

You can also analyze the conversion funnel to identify where users drop off, enabling you to refine your strategies and improve conversion rates over time.

By mastering these reports, you can fully harness the power of Google Analytics and gain a comprehensive understanding of how users interact with your site, driving more informed decisions for growth in 2024.
Advanced Google Analytics Features

Advanced Google Analytics Features

Utilizing Google Analytics 4 (GA4)

Key Differences Between GA4 and Universal Analytics

Google Analytics 4 (GA4) represents a significant upgrade from Universal Analytics, shifting towards event-based rather than session-based tracking.

GA4 focuses on a user-centric data model, providing a more detailed understanding of cross-device and cross-platform behavior.

It also offers enhanced privacy controls, better compliance with regulations like GDPR, and more predictive analytics features powered by machine learning.

Unlike Universal Analytics, GA4 can automatically track user interactions such as scrolls, file downloads, and outbound link clicks without manual setup.

Setting Up GA4 Properties

To start using GA4, you’ll need to set up a GA4 property within your Google Analytics account. This can be done alongside your existing Universal Analytics property.

GA4 properties focus on tracking events, so after setup, it’s important to configure the key events you want to track, such as purchases, page views, and form submissions.

The setup process includes adding the GA4 tracking code to your website or using Google Tag Manager to implement the GA4 tags.

Leveraging GA4’s Predictive Capabilities

One of the standout features of GA4 is its predictive analytics capabilities. Powered by machine learning, GA4 can generate insights and predictions on user behavior, such as the likelihood of a user converting or churning.

These predictive metrics can help businesses proactively target high-value users with tailored marketing strategies, allowing for more efficient resource allocation and improved campaign performance.

Predictive insights are especially valuable for forecasting trends and identifying potential growth opportunities.

Enhanced eCommerce Tracking

Setting Up Enhanced eCommerce

Enhanced eCommerce tracking in GA4 enables businesses to monitor the entire shopping journey, from product views to purchases.

Setting it up involves configuring your GA4 property to track key eCommerce events, such as product impressions, add-to-cart actions, checkout process steps, and completed transactions.

Built-in integrations make it easier to implement enhanced eCommerce tracking for websites using platforms like Shopify or WooCommerce.

Analyzing Shopping Behavior and Checkout Process

With enhanced eCommerce tracking, you can access detailed reports on user shopping behavior, including product views, cart abandonment rates, and checkout drop-offs.

The Shopping Behavior report allows you to visualize the customer journey, helping you identify areas where users abandon their shopping carts or fail to checkout.

By analyzing these patterns, you can optimize your sales funnel and reduce friction in the buying experience.

Leveraging Product Performance Reports

Product performance reports provide insights into how individual products are performing on your website. These reports include metrics such as product revenue, quantity sold, and average order value.

You can also analyze which products are frequently added to carts but not purchased, offering opportunities for retargeting or improving product descriptions.

Product performance data helps eCommerce businesses make informed decisions about inventory, pricing, and marketing efforts.

Using Google Tag Manager with Google Analytics

Introduction to Google Tag Manager

Google Tag Manager (GTM) is a tag management system that allows you to add and manage marketing and analytics tags without directly modifying your website’s code.

With GTM, you can easily implement Google Analytics tracking, along with other third-party tools like Facebook Pixel or AdWords conversion tracking.

GTM simplifies the process of adding, modifying, and removing tags, enabling marketers to be more agile in their tracking efforts.

Setting Up Tags, Triggers, and Variables

In GTM, tags are snippets of code that track specific actions on your website, such as page views or button clicks.

Triggers are the conditions that determine when a tag should fire, while variables are dynamic values used within tags and triggers, such as URLs or event categories.

Setting up tags, triggers, and variables in GTM allows you to track virtually any user interaction, from clicks on a specific element to video plays or form submissions, giving you full control over your data collection.

Linking Google Tag Manager with Google Analytics

To connect GTM with Google Analytics, you need to create a Google Analytics tag within GTM and configure it to send data to your GA4 property.

By linking GTM and Google Analytics, you can easily manage your tracking setup and add additional custom event tracking without needing to alter your website code.

This seamless integration enhances the flexibility of your analytics, allowing you to gather more granular data and make data-driven decisions to improve your site’s performance.

Analyzing Audience Behavior

Understanding Audience Demographics

Analyzing Age, Gender, and Interests

Google Analytics provides detailed demographic insights, helping you understand your audience’s age, gender, and interests.

This data is invaluable for tailoring your content and marketing efforts to match your users’ preferences.

By analyzing the age and gender distribution, you can identify whether your content resonates more with specific groups, and adjust your messaging or targeting accordingly.

Interest data reveals users’ affinities in categories like technology, fashion, or travel, enabling more personalized content creation and product recommendations.

Geographic and Language Insights

Geographic and language insights help you determine where your visitors are located and the languages they speak.

This information is crucial for businesses looking to expand into new markets or optimize their localization efforts.

By analyzing geographic data, you can identify key regions with high traffic but low conversion rates, signaling opportunities to improve local targeting or language-specific marketing.

These insights also help you tailor your website’s content and language options to better serve your audience’s needs, enhancing user engagement.

Identifying User Behavior

Tracking User Flow and Behavior Patterns

Google Analytics allows you to track user flow, which visualizes the path users take as they navigate your website.

This feature highlights how visitors move from page to page, where they drop off, and which content keeps them engaged.

You can optimize your site’s structure and content by identifying behavior patterns, such as the most common entry and exit pages to improve user retention and guide them toward conversions. Understanding user flow is key to enhancing the overall user experience.

Analyzing Session Duration and Bounce Rate

Session duration and bounce rate are critical metrics that provide insights into user engagement.

Session duration refers to how long users spend on your site during a visit, while bounce rate measures the percentage of visitors who leave after viewing only one page.

High session durations generally indicate that users find your content valuable, whereas high bounce rates may suggest that visitors are not finding what they’re looking for.
Analyzing these metrics helps identify areas where content or design improvements are needed to increase engagement.

Segmentation and Audience Targeting

Creating and Using Custom Segments

Custom segments in Google Analytics allow you to group users based on specific behaviors, demographics, or traffic sources.

For example, you can create segments for returning visitors, users who made a purchase, or those who abandoned their carts.

These segments enable more focused analysis, helping you compare different audience groups and understand how they behave on your site.

Custom segments are powerful tools for identifying trends and optimizing your strategies for specific user groups.

Using Audience Insights for Targeted Marketing

Audience insights from Google Analytics can significantly improve your marketing strategies by providing data-driven guidance for targeted campaigns.

You can create more effective marketing messages by understanding which segments of your audience are most engaged or likely to convert.

For instance, if a particular age group shows high conversion rates, you can focus your advertising efforts on that demographic.

Audience insights also inform remarketing efforts, enabling you to re-engage users who have interacted with your site but have not yet converted.

Acquisition Analysis

Overview of Traffic Sources

Direct, Organic, Paid, and Referral Traffic

Google Analytics provides detailed insights into the various traffic sources that drive visitors to your website. Direct traffic refers to users who access your site by typing the URL directly into their browser.

Organic traffic comes from search engines when users find your site through unpaid search results. Paid traffic originates from advertisements like Google Ads or social media ads, while referral traffic occurs when users are directed to your site from external websites.

By analyzing these traffic sources, you can identify the most effective channels and focus your marketing efforts accordingly to boost engagement and conversions.

Understanding Social Media Traffic

Social media traffic, categorized separately in Google Analytics, comes from platforms like Facebook, Instagram, Twitter, and LinkedIn.

Monitoring this traffic helps you understand how your social media campaigns perform and which platforms drive the most engagement.

You can assess whether social media posts, ads, or influencer collaborations successfully attract visitors, and optimize your social strategy based on these insights.

You can fine-tune your content and advertising efforts to maximize return on investment by identifying which social networks generate the highest-quality traffic.

Campaign Tracking with UTM Parameters

Setting Up UTM Parameters for Campaigns

UTM parameters are small snippets of code added to URLs that allow you to track the performance of individual marketing campaigns in Google Analytics.

By tagging links with UTM parameters, you can monitor the effectiveness of specific emails, social media posts, ads, or any external marketing initiatives.

Setting up UTM parameters involves adding fields like campaign source, medium, and name to your URLs, providing granular data on how users are arriving at your site.

This method helps ensure precise tracking of all marketing efforts, offering detailed insights into which campaigns are driving the most traffic and conversions.

Analyzing Campaign Performance

Once UTM parameters are in place, you can analyze the performance of each campaign in Google Analytics. This includes reviewing traffic volume, user engagement, and conversion rates for each campaign source.

By comparing different campaigns, you can identify which are delivering the best results and which need adjustments.

Tracking performance helps optimize your marketing strategies, enabling you to allocate resources to the most successful campaigns and improve the ones that are underperforming.

SEO Insights with Google Analytics

Integrating Google Search Console with Google Analytics

Integrating Google Search Console with Google Analytics allows you to gain deeper SEO insights by combining organic search data with site performance metrics.

Search Console provides valuable information about how your website is performing in Google Search, including search queries that drive traffic, click-through rates (CTR), and average search position.

By linking it with Google Analytics, you can analyze how search visitors behave once they land on your site, offering a more holistic view of your SEO performance.

Analyzing Organic Search Traffic and Keywords

With the integration of Google Search Console, you can track organic search traffic and see which keywords are bringing visitors to your website.

This allows you to identify the most effective search terms and optimize your content to target relevant queries.

By monitoring organic search performance over time, you can assess your SEO strategy, adjust keyword targeting, and identify new opportunities for driving organic traffic.

Google Analytics also enables you to monitor the behavior of organic visitors, such as their bounce rates and conversion rates, helping you refine your SEO tactics for better results.

Behavioral Analysis

Understanding Site Content Performance

Analyzing Page Views and Unique Page Views

Google Analytics allows you to track both page views and unique views to understand how well your site content performs.

Page views represent the total number of times a page on your website has been viewed, while unique page views track how many individual sessions involved viewing a specific page.

By comparing these metrics, you can identify your most popular pages and determine which content drives repeat visits.

Understanding these metrics helps you assess what type of content resonates best with your audience and adjust your content strategy to maximize user engagement.

Understanding Average Time on Page and Bounce Rate

Two critical metrics for evaluating content performance are average time on page and bounce rate.

Average time on page measures how long users spend on a particular page, providing insight into how engaging and valuable your content is.

A longer time on page usually indicates that users find your content useful and are engaging with it. On the other hand, the bounce rate shows the percentage of visitors who leave after viewing only one page.

A high bounce rate may suggest that users are not finding what they are looking for or that the page’s content is not compelling enough to keep them exploring.

By analyzing these metrics, you can identify areas for improvement to capture your audience’s attention better.

Site Search Analysis

Setting Up Site Search Tracking

Google Analytics provides the ability to track site search behavior, offering insights into what users are searching for on your website.

Setting up site search tracking involves enabling this feature in your Google Analytics account and configuring it to capture queries entered into your site’s search bar.

This data allows you to see exactly what users are trying to find on your site, giving you valuable information about potential content gaps or opportunities to enhance user experience by making popular content more accessible.

Analyzing Site Search Queries for User Intent

Once site search tracking is enabled, you can analyze the search queries to understand user intent.

Reviewing what users are searching for reveals what content they are struggling to find, what products or services they are interested in, and even what terminology they use.

By analyzing these queries, you can optimize your site’s navigation, adjust product listings, or create new content tailored to meet user needs.

This insight into user intent helps improve site structure and content relevancy, ultimately enhancing user satisfaction and engagement.

Event Tracking and Analysis

Setting Up Events for Specific User Actions

Event tracking in Google Analytics allows you to monitor specific user actions on your website that go beyond standard page views, such as clicking a button, downloading a file, or watching a video.

Setting up events involves adding custom code or using Google Tag Manager to define what constitutes an event (e.g., form submissions, video plays) and how it should be recorded in Analytics.

By tracking these interactions, you gain detailed insights into how users engage with your site’s key elements.

Analyzing Event Data for User Engagement

Once events are set up, analyzing the data helps you understand which site elements users are interacting with most and how those interactions contribute to overall engagement.

For example, tracking how often users download a brochure, sign up for a newsletter, or click a call-to-action button can give you a clear picture of their interest in your offerings.

By analyzing event data, you can optimize your website’s layout and functionality, ensuring that high-engagement elements are prominently featured and that users have a seamless experience.

By thoroughly analyzing user behavior through these Google Analytics features, you can make data-driven decisions to enhance content performance, improve site navigation, and boost user engagement on your website.

Conversion Tracking and Optimization

Conversion Tracking and Optimization

Setting Up Conversion Goals

Types of Conversion Goals (Destination, Duration, Pages/Screens per Session, Event)

Conversion goals are crucial for measuring the effectiveness of your website in meeting business objectives.

Google Analytics offers various types of conversion goals to track user actions. Destination goals track when a user reaches a specific URL, such as a thank-you page after completing a purchase.

Duration goals measure the time a user spends on your website, which is useful for engagement-based objectives.

Pages/Screens per session goals help you track the number of pages a user visits within a session, indicating how deeply users are exploring your content.

Event goals allow you to track specific actions such as video plays, button clicks, or form submissions. Setting up these goals helps you monitor key performance indicators (KPIs) and assess how well your site is converting visitors into leads or customers.

Analyzing Goal Conversion Rates

Once conversion goals are established, it’s essential to analyze goal conversion rates to determine how effectively your website is achieving its objectives.

Goal conversion rates measure the percentage of visitors who completed the defined action, providing insight into the user journey and the effectiveness of your website’s design and content.

Low conversion rates may signal that visitors are encountering barriers, such as confusing navigation, slow page load times, or unclear calls to action.

By regularly analyzing these rates, you can identify areas for improvement and take steps to optimize your site for higher conversions.

Funnel Visualization

Setting Up and Analyzing Funnel Reports

Funnel visualization allows you to track and analyze the steps users take before completing a conversion, offering insight into how visitors move through your website.

Setting up funnel reports in Google Analytics involves defining each step of the process (e.g., landing page > product page > checkout) to monitor user progress.

These reports visually display where users enter and exit the funnel, enabling you to analyze each stage of the user journey.

Funnel reports are particularly valuable for eCommerce websites, where understanding the checkout process can reveal opportunities to streamline the experience and reduce abandonment.

Identifying Drop-Off Points in Conversion Funnels

Analyzing funnel reports helps identify drop-off points—stages where users abandon the conversion process. High drop-off rates at certain stages could indicate issues such as complex forms, slow loading times, or unclear instructions.

You can take targeted actions by identifying these problem areas, such as simplifying forms, improving page load speed, or refining your calls to action.

Reducing drop-offs at key stages in the conversion funnel is essential for maximizing conversion rates and enhancing user experience.

A/B Testing and Experiments

Setting Up A/B Tests in Google Analytics

A/B testing is a powerful optimization technique that allows you to compare two or more versions of a webpage to see which one performs better in terms of conversions.

Setting up A/B tests in Google Analytics involves creating two variations of a page (e.g., different headlines, call-to-action buttons, or page layouts) and splitting traffic between them.

You can determine which version delivers the best results by tracking user interactions and conversion rates for each variation. This data-driven approach to website design ensures that changes are based on actual user behavior rather than guesswork.

Analyzing Experiment Results for Conversion Optimization

After running an A/B test, it’s crucial to analyze the results to understand which version of the page outperformed the other and why.

Google Analytics provides detailed insights into metrics such as conversion rate, bounce rate, and session duration for each variation.

By examining these metrics, you can identify the elements that significantly impacted user behavior.

Implementing the winning variation across your site and continuously testing new ideas can lead to ongoing improvements in conversion optimization, helping you achieve higher success rates with your marketing efforts.

By mastering conversion tracking and optimization through Google Analytics, you can make informed decisions that improve the effectiveness of your website, reduce user friction, and ultimately boost your business outcomes.

Reporting and Data Visualization

Customizing Google Analytics Reports

Creating Custom Reports for Specific Insights

Google Analytics offers the flexibility to create custom reports tailored to your unique business needs and goals.

Utilizing the custom report feature, you can select specific dimensions and metrics relevant to your analysis, such as user demographics, traffic sources, or conversion rates.

This customization allows you to drill down into the data that matters most, providing a clearer picture of how different segments of your audience interact with your site.

For example, you can create a custom report to track the performance of a particular marketing campaign or to analyze the behavior of users from a specific geographic location, offering actionable insights that standard reports may not fully capture.

Using Google Data Studio for Advanced Visualization

For more advanced data visualization, integrating Google Analytics with Google Data Studio can enhance your reporting capabilities.

Google Data Studio allows you to create interactive and visually appealing dashboards and reports that pull data from various sources, including Google Analytics.

With its drag-and-drop interface, you can build custom charts, graphs, and tables to present your data in a more understandable format.

This tool helps in transforming complex data sets into easily digestible visuals, making it simpler to identify trends, patterns, and anomalies at a glance.

By using Google Data Studio, you can create comprehensive, branded reports that can be shared with stakeholders or used for in-depth analysis.

Automated Reporting and Alerts

Setting Up Automated Email Reports

Automated email reports in Google Analytics streamline the process of keeping track of your metrics without having to manually generate reports.

You can set up scheduled email reports to be sent to your inbox or to other recipients at specified intervals, such as daily, weekly, or monthly.

These reports can include various metrics and dimensions, depending on your needs.

Automated reports ensure that key performance data is regularly reviewed, making it easier to stay informed about your website’s performance and to quickly address any issues or opportunities that arise.

Creating Custom Alerts for Significant Changes

Custom alerts in Google Analytics notify you of significant changes in your website’s performance metrics, allowing for timely intervention.

By setting up custom alerts, you can monitor specific conditions, such as a sudden drop in traffic, a spike in bounce rates, or deviations from expected conversion rates.

These alerts can be configured to trigger notifications via email or SMS, ensuring that you are promptly informed of any critical issues.

Custom alerts help you stay proactive in managing your website’s performance and addressing potential problems before they impact your business goals.

Sharing and Collaborating with Google Analytics Data

Sharing Reports with Team Members and Stakeholders

Google Analytics makes it easy to share reports with team members and stakeholders, fostering collaboration and transparency.

Reports and dashboards can be shared directly through email, or you can provide access via shared links to Google Data Studio reports.

This sharing capability allows all relevant parties to view the same data, facilitating discussions and decision-making based on consistent information.

By sharing reports, you ensure that everyone involved in the project has up-to-date insights and can contribute to data-driven strategies.

Collaborating with Google Analytics Data in Real-Time

Real-time collaboration with Google Analytics data enables teams to work together more effectively.

Through tools like Google Data Studio, team members can view and interact with live dashboards and reports, providing immediate feedback and insights.

Real-time data sharing and collaboration allow for dynamic adjustments to strategies based on current data trends and user behavior.

This collaborative approach helps in making swift, informed decisions and aligns team efforts with the latest performance metrics.

By leveraging customized reports, advanced visualizations, automated alerts, and collaborative tools, you can enhance your data analysis and reporting capabilities in Google Analytics, leading to more informed decision-making and improved business outcomes.

Privacy and Compliance

Understanding GDPR and CCPA Compliance

Key Privacy Regulations Affecting Google Analytics

In 2024, adhering to privacy regulations such as the General Data Protection Regulation (GDPR) and the California Consumer Privacy Act (CCPA) is crucial for businesses using Google Analytics.

GDPR, applicable to businesses operating within the European Union, mandates strict guidelines on data collection, user consent, and data protection.

Similarly, the CCPA requires businesses in California to provide transparency about data collection practices and to offer users the right to access, delete, or opt out of the sale of their personal information.

Both regulations emphasize the importance of obtaining explicit consent from users before collecting their data and ensuring that data handling practices comply with legal standards.

Anonymizing IPs and Managing User Data

To comply with GDPR and CCPA, Google Analytics offers features to anonymize IP addresses, which helps protect user privacy by masking part of the IP address.

This anonymization reduces the risk of identifying individual users while still allowing you to gather meaningful data about user behavior.

Additionally, it is essential to implement robust data management practices, including obtaining user consent before tracking, providing clear privacy notices, and ensuring users can exercise their rights regarding their personal data.

Regularly reviewing and updating privacy policies and procedures ensures that your data collection and processing practices remain compliant with evolving regulations.

Data Retention and Management

Setting Up Data Retention Policies

Effective data retention policies are vital for managing how long user data is stored in Google Analytics.

Google Analytics provides settings to define the retention period for user and event data, which can range from 14 months to an indefinite period.

Setting up data retention policies ensures that data is kept only for as long as necessary to meet your analytical needs and comply with legal requirements.

Regularly reviewing and adjusting these settings helps you balance the need for historical data with the commitment to user privacy and data protection.

Managing User Deletion Requests

Managing user deletion requests is a critical aspect of compliance with privacy regulations. Under GDPR and CCPA, users have the right to request the deletion of their personal data.

Google Analytics provides tools to help manage these requests by allowing you to delete user data associated with specific identifiers.

Implementing a clear process for handling deletion requests, including verifying the identity of requestors and ensuring data is removed from both Google Analytics and associated systems, helps you adhere to privacy regulations and maintain trust with your users.

By understanding and implementing privacy and compliance measures such as GDPR and CCPA adherence, data anonymization, and effective data retention and management, you can ensure that your use of Google Analytics respects user privacy and meets legal requirements.

Transform Your Business: Master Digital Marketing with Our Comprehensive eBook!

Ready to take your business to the next level? Our digital marketing guide is designed to help you unlock the secrets to online success. Whether you're a beginner or an experienced marketer, this eBook offers practical strategies and insights to boost your skills and grow your business. Start your journey towards digital marketing mastery today and achieve the success you've always dreamed of!

Troubleshooting and Best Practices

Common Google Analytics Issues and Fixes

Troubleshooting Tracking Code Issues

One of the most common issues in Google Analytics is incorrect or missing tracking code, which can lead to incomplete or inaccurate data collection.

To troubleshoot tracking code issues, start by verifying that the Google Analytics tracking code is correctly installed on every page of your website.

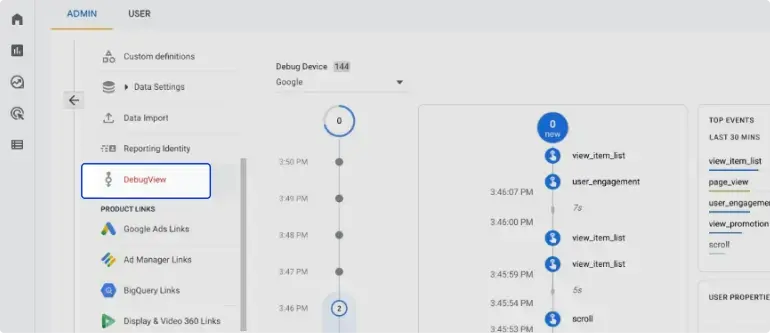
Ensure that the tracking code is placed just before the closing </head> tag for optimal performance. Use tools like the Google Tag Assistant or Google Analytics Debugger browser extensions to check if the code is firing correctly and to identify any potential errors.

Additionally, confirm that there are no conflicts with other scripts or tags on your site that might affect data collection.

Resolving Data Discrepancies Between Reports

Data discrepancies between different reports or platforms can arise from various factors, including tracking code issues, filters, or different time zone settings.

To resolve these discrepancies, first, ensure that the time zones set in Google Analytics match those of your data sources and reporting tools.

Check for any filters or segments applied in your reports that might exclude certain data.

Additionally, compare metrics across different views or properties to identify any inconsistencies.

Regularly auditing your data collection setup and configuration can help identify and address the root causes of discrepancies.

Best Practices for Accurate Data Collection

Ensuring Data Accuracy with Google Analytics

Accurate data collection is essential for making informed decisions based on your Google Analytics reports.

To ensure data accuracy, start by regularly reviewing and updating your tracking code to reflect any changes to your website.

Implement data validation practices, such as setting up filters to exclude internal traffic and spam referrals, to prevent data contamination.

Additionally, use Google Analytics’ built-in features like goals and events to track specific user actions and interactions accurately.

Consistent monitoring and maintenance of your tracking setup help in maintaining data integrity and reliability.

Regular Audits and Data Quality Checks

Conducting regular audits and data quality checks is crucial for identifying and addressing any issues that may affect data accuracy.

Perform periodic audits to review your Google Analytics configuration, including tracking codes, filters, and goals, to ensure they align with your reporting needs.

Use data quality checks to validate that the data being collected reflects actual user behavior and interactions on your site. Look for anomalies or unexpected trends in your reports, and investigate any potential causes.

Regularly updating your tracking setup and conducting thorough audits help maintain high data quality and support effective decision-making.

By addressing common issues such as tracking code errors and data discrepancies, and adhering to best practices for data accuracy and regular audits, you can ensure that your use of Google Analytics provides reliable insights for enhancing your business strategies.

Conclusion: How to Use Google Analytics

In 2024, digital marketing is still very complicated, but mastering Google Analytics is still the best way to get useful information and improve your online plans.

This complete guide has talked about all the important parts of Google Analytics, from setting up an account and using the basic features to more advanced features like GA4, better tracking for eCommerce, and integrating Google Tag Manager.

We talked about the ins and outs of analyzing audience behavior, acquisition platforms, and site content. We also stressed the importance of tracking conversions, reporting on them, and showing the data visually.

Looking ahead, Google Analytics will likely get even better in the future as it constantly changes. In a digital world with high competition, it will be important to adapt to these changes and use new features.

Data privacy laws like GDPR and CCPA change how we collect and handle user data. Following best practices will help us stay in line with the law and keep our data safe.

Google Analytics is still an important tool for businesses that want to understand their audience, improve their online presence, and get real results in 2024.
To reach your business goals, you can make the most of Google Analytics by constantly improving your analytics methods and keeping up with the latest changes.

FAQs: How to Use Google Analytics

To set up Google Analytics, create an account at analytics.google.com, then follow the prompts to set up a property for your website. Install the tracking code provided by Google Analytics on your site, and configure goals and conversion tracking to start collecting data.

Universal Analytics relies on a session-based model, whereas GA4 uses an event-based model, allowing for more flexible tracking of user interactions. GA4 also offers enhanced cross-device tracking, predictive analytics, and improved integration with Google Ads and other Google products.

Analyze user behavior through conversion tracking and funnel visualization to identify drop-off points and optimize the user journey. Use A/B testing and experiment results to test changes and measure their impact on conversion rates, and leverage audience insights to target specific user segments more effectively.

Yes, Google Analytics offers features to help with GDPR and other privacy regulations, such as IP anonymization and data retention controls. However, it's crucial for users to configure these settings properly and ensure their use of Google Analytics aligns with applicable privacy laws.

How to Create a Sitemap That Drives Traffic: Tips and Tricks

Learning how to create a sitemap is essential for anyone looking to boost their website’s visibility and traffic.

Now that search engines control web traffic flow, a well-made sitemap is your secret tool for getting more people to visit your site.

Sitemaps are more than just technical tools; they’re like a map that shows search engines how to find everything on your website, even if they get lost in the content.

Whether you run an e-commerce site or a blog with lots of posts, knowing and improving your website can mean the difference between being unknown and being successful online.

This guide will start by going over the basics of sitemaps and why they are important for SEO.

It will also give you tips on how to make a sitemap that not only organizes your content but also makes your website more visible and brings more people to it.

You need to know how sitemaps work to make your website more visible in search engines and attract more visitors.

A sitemap is an organized list of all the pages on your website. It helps search engines like Google and Bing find and index your content more quickly.

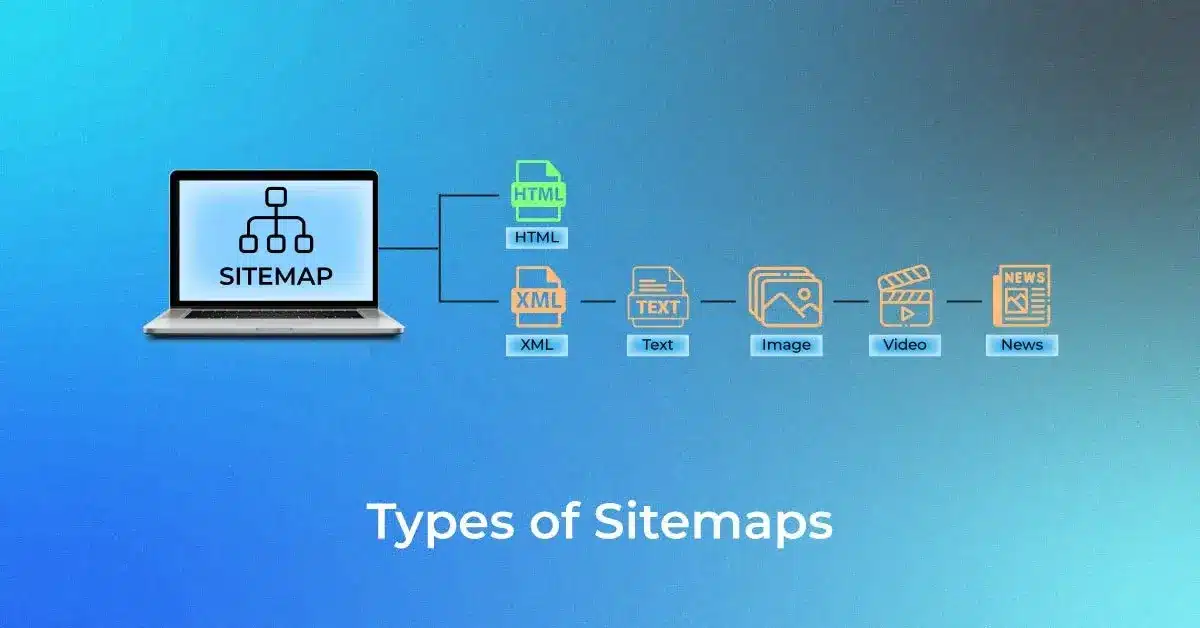
There are different kinds of sitemaps, and each one is used for a different thing. The XML sitemap is the most popular. Its main purpose is to help search engines find your site.

It gives search engines a detailed, machine-readable map of your website’s layout, which makes it easier for them to find and rank your content.

On the other hand, HTML sitemaps are designed to be easy for people to use. They provide a list of your website’s pages that can be clicked on to make navigation easier for users.

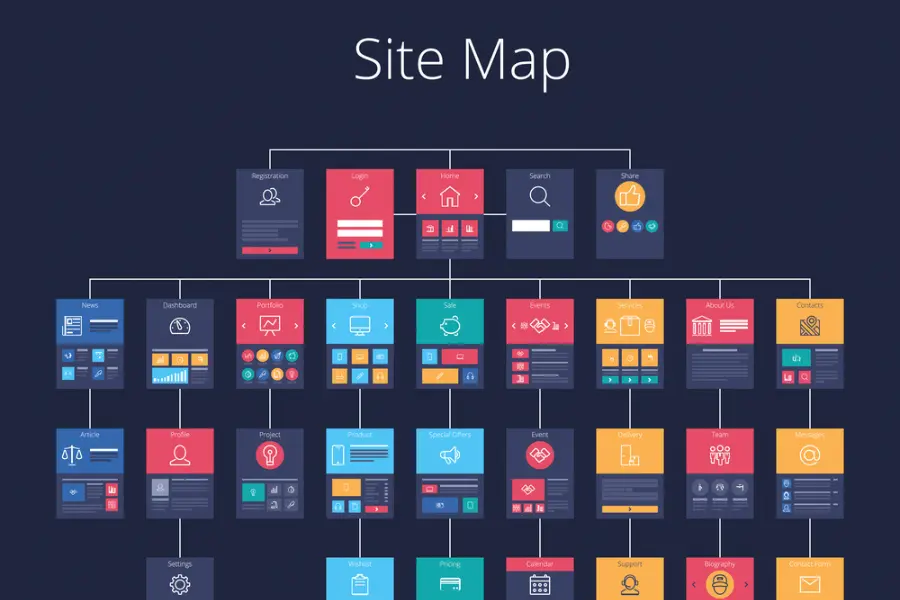
There are also mobile sitemaps and visual sitemaps. Visual sitemaps show your site’s layout visually, which helps with design and usability.

Mobile sitemaps make sure that mobile content is easy to find and optimized for mobile SEO.

Sitemaps are very important for SEO because they have a direct effect on how search engines crawl and index your page.

Including all of your important pages in a sitemap will ensure that search engines can crawl and scan them.

This makes your content more likely to appear in search results. A well-structured sitemap also improves the user experience by making it easy for them to find the information they need by giving them clear navigation paths.

This can make the user experience better, which can lead to longer site visits, lower bounce rates, and better search engine ranks in the end.

Basically, a well-made sitemap is an important tool for driving people to your site because it makes it easy for both people and search engines to navigate.

Unlock Your Path to Success with Digital Marketing & AI Mastery Course!

Are you ready to transform your business and make serious money? Explore comprehensive Digital Marketing & AI course on Teachable is your key to mastering the skills that drive revenue and attract customers.

Checkout Now!

Types of Sitemaps

Types of Sitemaps

Sitemaps play a crucial role in organizing website content and enhancing both user experience and SEO performance.

Understanding the different types of sitemaps can help you optimize your site more effectively.

Below, we’ll explore the various types, their structures, uses, and specific benefits.

XML Sitemaps

Structure and Use:

An XML sitemap is a file that lists all the URLs of your website in a structured format readable by search engines.

It helps search engine bots to crawl and index your site more efficiently.

Typically, an XML sitemap includes essential metadata about each URL, such as the last modified date, change frequency, and the priority of the page relative to other pages on the site.

Benefits for SEO:

XML sitemaps are invaluable for SEO as they ensure that all pages, particularly new or updated ones, are quickly discovered by search engines.

This is particularly beneficial for large websites with complex structures or newly launched sites where some pages may not be linked internally.

By guiding search engines to the most important pages, an XML sitemap can help improve your site’s overall indexation, leading to better rankings and increased organic traffic.

HTML Sitemaps

Structure and Use:

An HTML sitemap is a user-friendly webpage that lists all the main pages of a website, often organized hierarchically or by category.

Unlike XML sitemaps, HTML sitemaps are designed for human visitors, offering a clear overview of the site’s content and structure.

They typically include links to key sections, making it easier for users to navigate the site.

Enhancing User Experience:

HTML sitemaps enhance user experience by providing a comprehensive guide to the site’s content, helping users quickly find what they’re looking for.

This can reduce bounce rates and increase engagement, as visitors are more likely to explore other parts of the site.

Moreover, a well-structured HTML sitemap can contribute to better SEO indirectly by improving user satisfaction and retention.

Visual Sitemaps

Structure and Use:

A visual sitemap is a graphical representation of a website’s structure, often created during the planning or redesign phase.

It shows the relationship between pages and how they are organized within the site’s hierarchy.

Visual sitemaps can be created using tools like wireframes or flowcharts and are particularly useful in the design process.

Benefits for Design and Usability:

Visual sitemaps are beneficial for web designers and developers as they provide a clear, intuitive view of the site’s architecture before the site is built or restructured.

They help in identifying potential usability issues, ensuring that the website is easy to navigate and meets user expectations.

Additionally, visual sitemaps can facilitate better communication between stakeholders by providing a shared understanding of the site’s structure.

Mobile Sitemaps

Importance for Mobile SEO:

Mobile sitemaps are tailored specifically for mobile-friendly pages, ensuring that they are easily discovered and indexed by search engines.

With the increasing importance of mobile-first indexing, having a dedicated mobile sitemap can significantly enhance your site’s performance on mobile search results.

These sitemaps include URLs that are optimized for mobile devices, ensuring that search engines recognize the mobile-friendly version of your content.

Creating Mobile-Friendly Sitemaps:

To create a mobile sitemap, ensure that it includes only the mobile-friendly URLs or the pages specifically designed for mobile users.

This might involve creating separate URLs for mobile versions of your pages or using responsive design principles.

Submitting a mobile sitemap to search engines can improve the visibility of your mobile pages, leading to better rankings and increased traffic from mobile users.

How to Create a Sitemap Step-by-Step

How to Create a Sitemap Step by Step

Creating a sitemap is a crucial process ensuring your website is well-structured and easily navigable for users and search engines.

By following a step-by-step approach, you can design a sitemap that not only improves your site’s organization but also drives traffic.

Here’s how to create a sitemap effectively, along with best practices for design.

Steps to Create a Sitemap

Identify Key Pages and Content:

The first step in creating a sitemap is to identify the key pages and content that you want to include. Focus on the most important pages that define the core structure of your website, such as your homepage, category pages, product pages, and essential blog posts.

Additionally, consider including any new or frequently updated content that you want search engines to prioritize.

By carefully selecting these pages, you can ensure that your sitemap reflects the most valuable parts of your site.

Choose the Right Sitemap Type:

After identifying your key content, the next step is to choose the appropriate type of sitemap.

Depending on your website’s needs, you might opt for an XML sitemap, which is best for search engine crawling and indexing, or an HTML sitemap, which is more user-friendly and enhances navigation.

Visual sitemaps are ideal during the design phase of a site, while mobile sitemaps cater specifically to mobile users.

Selecting the right type ensures that your sitemap aligns with your website’s goals and audience.

Use Sitemap Generators and Tools:

Once you’ve chosen the sitemap type, you can use sitemap generators and tools to automate the creation process.

There are numerous tools available, such as XML Sitemap Generator, Screaming Frog, or Yoast SEO (for WordPress users), that can help you generate a sitemap quickly and accurately.

These tools will crawl your site, gather the necessary URLs, and create a sitemap file that you can easily upload to your website’s root directory.

This step saves time and ensures that your sitemap is properly formatted for search engines.

Best Practices for Sitemap Design

Hierarchical Structure:

When designing your sitemap, it’s important to organize your content in a clear, hierarchical structure.

This means arranging your pages in a logical order, starting with the most important pages, like your homepage, at the top, followed by categories, subcategories, and individual content pages.

A well-structured sitemap makes it easier for search engines to crawl your site and for users to navigate through your content, ultimately leading to better indexing and user experience.

Including Metadata:

Adding metadata to your sitemap is another best practice that can significantly enhance its effectiveness. Metadata includes information like the last modified date of each page, its change frequency, and priority level.

This data helps search engines understand how often your pages are updated and which ones are most important, allowing them to crawl and index your site more efficiently.

Including metadata can improve your site’s visibility in search results and ensure that your most critical pages are prioritized.

Regular Updates and Maintenance:

Finally, maintaining and regularly updating your sitemap is crucial for keeping it relevant and effective.

As your website grows and you add or remove content, your sitemap should be updated to reflect these changes.

Regularly check your sitemap to ensure all URLs are still valid, remove any outdated links, and add new pages as necessary.

Consistently maintaining your sitemap helps search engines stay up-to-date with your site’s structure, which can lead to improved rankings and sustained traffic growth.

Enhancing Sitemap Effectiveness

Creating a sitemap is just the first step in optimizing your website for better traffic and user engagement.

To maximize the impact of your sitemap, it’s essential to enhance its effectiveness through strategic optimization and user-friendly design.

Here’s how you can optimize both XML and HTML sitemaps to drive better SEO and improve user engagement.

Optimizing XML Sitemaps for Better SEO

Prioritizing Important Pages:

One of the key strategies to enhance your XML sitemap is to prioritize the most important pages of your website.

This involves assigning a higher priority to the pages that are crucial for your business, such as your homepage, key product or service pages, and cornerstone content.

By doing so, you signal to search engines which pages are most valuable, encouraging them to crawl and index these pages more frequently.

This prioritization helps ensure that your most important content ranks well in search results, driving more organic traffic to your site.

Setting Frequency of Updates:

In your XML sitemap, you can also set the frequency of updates for each page, indicating how often the content is likely to change.

For example, you might set a daily update frequency for a blog section where new posts are added regularly, while setting a monthly or yearly frequency for static pages like theAbout Ussection.

Properly setting these frequencies helps search engines understand how often they should revisit and re-crawl your pages, ensuring that your most current content is always indexed, which can lead to better SEO performance.

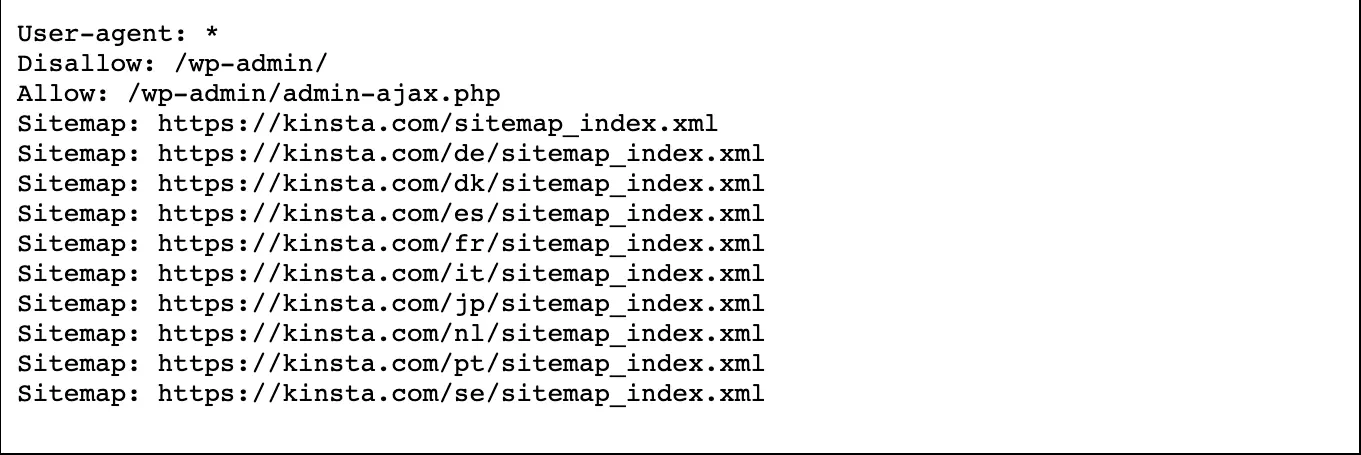
Using Sitemap Index Files:

For larger websites with numerous pages, using sitemap index files can significantly enhance the effectiveness of your XML sitemap.

A sitemap index file acts as a master file that links to multiple individual sitemaps, each covering different sections of your website.

This approach not only keeps your sitemap organized but also ensures that search engines can efficiently crawl and index all areas of your site without missing any content.

By segmenting your sitemap into smaller, more manageable parts, you improve the overall crawlability and indexation of your site.

Improving HTML Sitemaps for User Engagement

User-Friendly Layouts:

To make your HTML sitemap more effective, focus on creating a user-friendly layout that is easy to read and navigate.

This involves organizing your sitemap in a clear, hierarchical structure with headings and subheadings that guide users through different sections of your site.

Using a clean, minimalist design with ample white space and well-defined categories can make it easier for visitors to find what they’re looking for.

A user-friendly layout not only enhances the overall user experience but also encourages visitors to explore more of your site, leading to higher engagement rates.

Linking to Key Content:

Another way to improve the effectiveness of your HTML sitemap is by strategically linking to your key content.

This means including links to your most important pages, such as top-performing blog posts, high-converting landing pages, and popular product categories.

By placing these links in your sitemap, you make it easier for users to access your best content directly from the sitemap, which can increase page views and reduce bounce rates.

Additionally, these internal links help distribute link equity across your site, further boosting your SEO.

Clear Navigation and Search Features:

Enhancing your HTML sitemap with clear navigation and search features can significantly improve user engagement.

Include a simple, intuitive navigation menu at the top or side of your sitemap page, allowing users to jump to different sections with ease.

Additionally, incorporating a search feature within your sitemap can help visitors quickly locate specific content or pages they’re interested in.

Clear navigation and search options not only make your sitemap more functional but also contribute to a better overall user experience, keeping visitors on your site longer and encouraging them to explore further.

Submitting and Monitoring Sitemaps

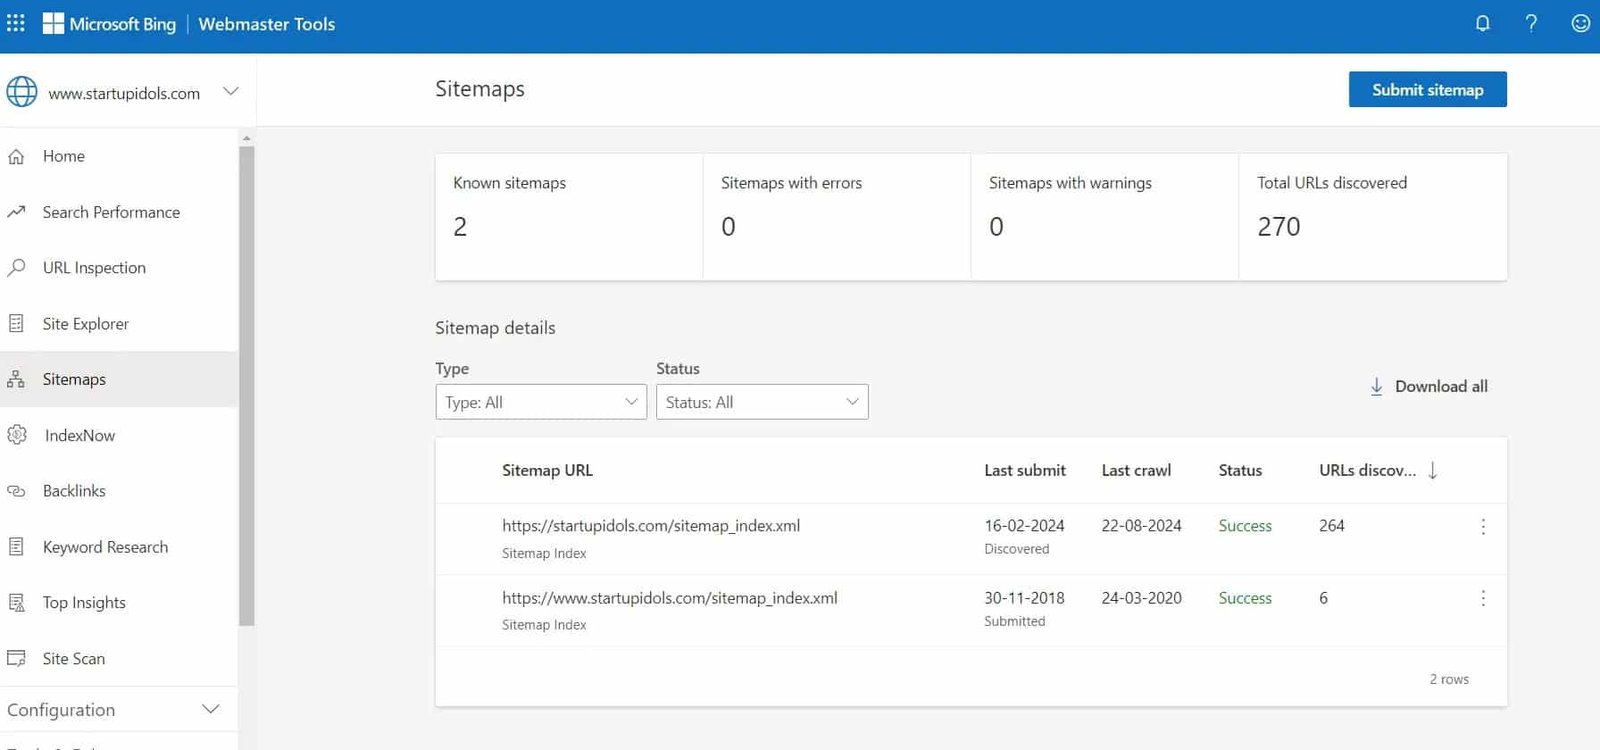
After creating a well-structured sitemap, the next crucial step is submitting it to search engines and monitoring its performance.

This process ensures that your sitemap is effectively guiding search engines to index your website properly, ultimately driving more traffic.

Here’s how to submit your sitemap and monitor its performance for optimal results.

Submitting Sitemaps to Search Engines

Google Search Console

Submitting Sitemaps to Search Engines

Google Search Console is one of the most important tools for submitting your sitemap.

To submit your sitemap, log in to Google Search Console, select your website property, and navigate to the “Sitemaps” section under the “Index” menu.

Enter the URL of your sitemap (typically found at yourwebsite.com/sitemap.xml) and click “Submit.”

Once submitted, Google will start crawling your sitemap, which helps ensure that your pages are indexed correctly and quickly.

Regularly checking the Sitemaps section in Google Search Console allows you to monitor the status of your submission and identify any potential issues.

Bing Webmaster Tools

Bing Webmaster Tools

Similarly, Bing Webmaster Tools is essential for ensuring your site is properly indexed by Bing.

To submit your sitemap, sign in to Bing Webmaster Tools, select your website, and go to the “Sitemaps” section.

Here, you can enter the URL of your sitemap and click “Submit.” Just like with Google, submitting your sitemap to Bing helps the search engine crawl and index your website more efficiently.

Bing Webmaster Tools also provides insights into how your sitemap is performing, making it easier to track and optimize your presence in Bing’s search results.

Monitoring Sitemap Performance

Analyzing Crawl Data:

Once your sitemap is submitted, it’s important to monitor its performance by analyzing crawl data.

Both Google Search Console and Bing Webmaster Tools provide detailed reports on how search engines are crawling your site.

These reports include data on how often your pages are being crawled, which pages are indexed, and any issues encountered during the crawl.

By regularly reviewing this data, you can gain insights into how well your sitemap is functioning and identify areas for improvement, such as pages that aren’t being crawled as expected.

Identifying and Fixing Errors:

Monitoring your sitemap also involves identifying and fixing any errors that may arise.

Common errors include broken links, pages returning 404 errors, or pages that are blocked by robots.txt.

Both Google Search Console and Bing Webmaster Tools will alert you to these issues, allowing you to address them promptly.

Fixing these errors is crucial for maintaining a healthy sitemap and ensuring that all your important content is accessible to search engines.

Regularly updating your sitemap to reflect these fixes can further enhance your site’s crawlability and improve its overall search engine performance.

By effectively submitting and monitoring your sitemap, you can ensure that search engines are indexing your site properly, ultimately leading to better visibility, higher rankings, and increased traffic.

Common Mistakes to Avoid

Creating an effective sitemap is essential for driving traffic, but there are common mistakes that can undermine your efforts.

By understanding and avoiding these pitfalls, you can ensure that your sitemap serves its purpose in boosting your website’s SEO and user experience.

Here are the key mistakes to avoid:

Overloading with Excessive URLs

One of the most common mistakes in sitemap creation is overloading it with excessive URLs.

While it might seem beneficial to include every single page on your website, a sitemap cluttered with too many URLs can confuse search engines and dilute the focus on your most important content.

Sitemaps should be concise and prioritize high-value pages that are most relevant to your audience and SEO goals.

Keeping your sitemap focused helps search engines efficiently crawl and index your site, leading to better visibility and improved rankings.

Ignoring Mobile and Local SEO

Another critical mistake is ignoring mobile and local SEO when creating your sitemap.

With the increasing use of mobile devices and the importance of local search, it’s vital to ensure that your sitemap caters to these aspects.

For mobile SEO, consider creating a mobile-specific sitemap that highlights pages optimized for mobile users.

For local SEO, ensure that your sitemap includes location-based pages, such as local business listings or region-specific content.

Addressing mobile and local SEO in your sitemap enhances your site’s relevance and accessibility, which can significantly boost traffic from these growing segments.

Neglecting Regular Updates

Neglecting to regularly update your sitemap is a mistake that can negatively impact your site’s SEO performance.

As your website evolves—adding new content, removing old pages, or updating existing information—your sitemap should reflect these changes.

An outdated sitemap can lead to search engines crawling outdated or irrelevant pages, which can hurt your rankings.

Regularly updating your sitemap ensures that search engines have an accurate map of your site, leading to better indexing and more consistent traffic growth.

Set a schedule to review and update your sitemap, especially after major changes to your site, to keep it effective and aligned with your SEO strategy.

By avoiding these common mistakes, you can create a sitemap that truly drives traffic and enhances both your SEO and user experience.

Tools and Resources

Creating an effective sitemap is much easier when you have the right tools and resources at your disposal.

From choosing the right sitemap generator to tapping into additional resources for ongoing learning, here’s how to equip yourself for success.

Sitemap Generators

Free Tools vs. Paid Tools:

When it comes to generating sitemaps, you have a variety of options ranging from free tools to more advanced paid solutions.

Free sitemap generators, such as XML-Sitemaps.com, are ideal for smaller websites with fewer pages. They offer basic features that can quickly create a simple XML sitemap.

However, for larger sites or those with complex needs, paid tools like Screaming Frog or Yoast SEO (premium version) provide more robust features, such as automated updates, advanced customization options, and integration with other SEO tools.

While free tools are sufficient for many, investing in a paid tool can be worthwhile for businesses seeking comprehensive control and optimization of their sitemaps.

Features to Look For:

When selecting a sitemap generator, it’s important to consider the features that will best support your website’s needs.

Key features to look for include the ability to create multiple types of sitemaps (XML, HTML, image, video, and mobile sitemaps), automatic updates whenever your site changes, and the ability to prioritize and set update frequencies for different pages.

Additionally, tools that offer integration with Google Search Console or Bing Webmaster Tools can streamline the submission process.

Advanced filtering options and error detection are also valuable, as they help ensure that your sitemap is accurate and effective.

Additional Resources

SEO Forums and Communities:

Staying updated on the latest trends and best practices in sitemap creation and SEO is crucial for ongoing success.

SEO forums and communities, such as Moz’s Q&A Forum, Google Search Central Help Community, or Reddit’s SEO community, are excellent resources for this.

These platforms allow you to ask questions, share experiences, and learn from other professionals who face similar challenges.

Engaging with these communities can provide you with insights into the latest tools, techniques, and common pitfalls, helping you continually refine your sitemap strategies.

Expert Blogs and Guides:

In addition to forums, reading expert blogs and guides is another valuable way to enhance your knowledge. Websites like Search Engine Journal, Ahrefs Blog, and Neil Patel’s blog regularly publish in-depth articles and how-to guides on creating and optimizing sitemaps.

These resources often include case studies, real-world examples, and step-by-step instructions that can help you better understand how to implement the latest techniques.

Following these experts not only keeps you informed about new developments in SEO but also provides actionable tips that you can apply directly to your own website.

By leveraging the right tools and resources, you can create a highly effective sitemap that not only improves your website’s SEO but also enhances the overall user experience, ultimately driving more traffic to your site.

Do You Want to Advertise on Social Media?

Link Collider offers free social media advertising.
Know More!

Conclusion: How to Create a Sitemap

A roadmap that brings people to your site is an important part of making it work better for both people and search engines.

We’ve talked about the most important parts of good sitemaps in this guide, from why they’re important to how to use best practices and avoid common mistakes.

Creating an XML sitemap for better SEO, an HTML sitemap for a better user experience, or using visual and mobile sitemaps—each type is important for the general performance of your website.

Remember that the most important things about a roadmap are how it’s organized, how relevant it is, and how often it’s updated.

First, figure out which parts are the most important and pick the right type of sitemap for your needs.

Use sitemap makers and other tools to make the process easier, and don’t forget to send your sitemap to search engines so they can properly index it.

Keeping an eye on your guide and making changes based on performance data will help it keep working well over time.

Some last tips for making a sitemap that gets people to your site are to prioritize high-value pages, make sure your sitemap works on mobile devices, and keep up with the latest SEO trends.

Not only will this help your search engine rankings, but it will also make it easier for people to find their way around your site, which will eventually lead to more visitors and more success for your business.

FAQs on How to Create a Sitemap

Update your sitemap whenever you make significant changes to your website, such as adding new pages, removing old ones, or updating content. Regular updates are recommended to ensure accurate indexing.

Yes, a sitemap can improve your website's ranking by ensuring search engines efficiently crawl and index your content, leading to better visibility in search results.

Popular tools include Yoast SEO for WordPress, Screaming Frog, and XML-Sitemaps.com, each offering various features for generating and managing sitemaps.

Identify errors using tools like Google Search Console, correct issues such as broken links or incorrect URLs, and then resubmit the updated sitemap to search engines.

Optimizing Your SEO with Robots.txt: A Comprehensive Guide

In this guide, you’ll learn how to create Robots.txt from scratch, ensuring that your site is optimized for both visibility and efficiency.

As SEO changes all the time, the Robots.txt file is a powerful but often forgotten tool that can make or break your site’s search engine exposure.

The Robots.txt file is the gatekeeper for search engine crawlers. It is very important for deciding which parts of your site are indexed and which ones stay hidden.

Any website owner who wants to make the most of their crawl budget, avoid duplicate content, and make sure that search engines only see the most valuable pages needs to know how to use this simple text file.

We’ll go over every detail of Robots.txt in this detailed guide, from its basic structure to more advanced techniques, to help you get the most out of it for your SEO strategy.

This guide will help you understand one of the most important parts of SEO, Robots.txt, whether you’re setting it up for the first time or making small changes to an existing file.

Understanding Robots txt

What is Robots.txt?

Robots.txt is a simple text file placed in the root directory of your website that acts as a set of instructions for search engine crawlers.

It tells these crawlers, often referred to as bots or spiders, which parts of your site they are allowed to access and which parts they should ignore.

By defining rules within the Robots.txt file, you can control how search engines interact with your site, ensuring that sensitive or irrelevant pages aren’t indexed.

This file plays a crucial role in managing your website’s crawl budget, helping to prioritize which content should be indexed by search engines.

History of Robots.txt

The Robots.txt file has its origins in the early days of the web, when search engines were just beginning to index online content.

The concept was first introduced in 1994 by Martijn Koster, who developed the Robots Exclusion Protocol as a way to prevent bots from accessing certain parts of a website.

Over the years, the Robots.txt file has evolved alongside search engines, becoming a standard tool for webmasters to communicate directly with crawlers.

While the original intention was to manage server load and privacy, its role has expanded to include SEO and site management as search engines have become more sophisticated.

Importance in SEO

In the context of SEO, Robots.txt is a powerful tool for controlling how search engines crawl and index your site.

By specifying which pages or files should be crawled and which should be ignored, you can prevent search engines from indexing duplicate content, low-value pages, or private areas of your site.

This not only helps in focusing the crawl budget on high-priority pages but also improves the overall efficiency of your site’s indexing process.

Properly configured, Robots.txt can enhance your site’s visibility by ensuring that only the most relevant content is indexed, leading to better search engine rankings and a more effective SEO strategy.

Components of Robots.txt

Syntax and Structure

The Robots.txt file consists of a series of directives that instruct search engine crawlers on how to interact with your website.

Each directive is made up of two parts: a field (like “User-agent”) and a value (like “Googlebot”).

The file is read from top to bottom, with each directive applying to the specific User-agent it references until a new User-agent is specified.

  • User-agent: This directive specifies which search engine crawler the following rules apply to. For example, if you want to set rules for Google’s crawler, you would use User-agent: Googlebot. You can also apply rules to all crawlers by using User-agent: *.

  • Disallow: This directive tells crawlers which pages or directories they should not access. For example, Disallow: /private/ would prevent crawlers from indexing any content within the “private” directory. Disallowing certain areas of your site can help you avoid indexing duplicate content or private information.

  • Allow: This directive is used to override a Disallow rule and permit crawlers to access specific pages or directories. For instance, if you’ve disallowed a directory but want to allow a particular file within it, you can use Allow: /private/specific-page.html.

  • Sitemap: Including the Sitemap: directive in your Robots.txt file helps crawlers discover your site’s sitemap. This is crucial for ensuring that search engines can find all your site’s important pages, even those not directly linked to your Robots.txt rules. The directive might look like this: Sitemap: https://www.yoursite.com/sitemap.xml.

Additional Directives

Beyond the basic syntax, there are additional directives in Robots.txt that offer more advanced control over how your site is crawled and indexed.

  • Crawl-delay: This directive instructs crawlers to wait for a specified number of seconds before crawling the next page on your site. While not supported by all search engines, Crawl-delay: 10 can be useful if you want to reduce the load on your server by limiting the crawl rate.

  • Noindex: Though not officially part of the Robots.txt specification, some search engines honor the Noindex directive. This command tells crawlers not to index specific pages or directories, effectively keeping them out of search results. However, it’s worth noting that the Noindex directive is better implemented through meta tags within the pages themselves rather than in Robots.txt, as its support can be inconsistent.

Understanding and correctly applying these components is vital for optimizing your site’s SEO performance.

By strategically using these directives, you can guide search engines to focus on the most important content, avoid overloading your server, and improve the overall efficiency of your site’s indexing.

How to Create Robots.txt File

how to create robot

Tools and Resources

Creating a Robots.txt file is a straightforward process, and there are several tools and resources available to help you get started.

  • Online Generators: For beginners, online Robots.txt generators are a useful resource. These tools allow you to create a basic file by selecting options from a user-friendly interface. Websites like Google’s Webmaster Tools or third-party tools like Robots.txt Generator provide templates and guidance, making it easy to generate a functional Robots.txt file without needing to understand the underlying syntax.

  • Manual Creation: For those with a bit more technical knowledge, manually creating a Robots.txt file offers greater control and customization. You can create a Robots.txt file using any text editor (like Notepad or Sublime Text). By manually writing the directives, you can tailor the file to meet the specific needs of your website, ensuring that it aligns perfectly with your SEO strategy.

Setting Up Your First Robots.txt

Setting up your first Robots.txt file is a simple process that involves a few key steps:

  1. Open a text editor: Start by opening a text editor and creating a new file named robots.txt.

  2. Specify User-agents: Begin by identifying which search engine crawlers you want to create rules for using the User-agent: directive. For example, to target all bots, you would write User-agent: *.

  3. Define Disallow and Allow Rules: Next, specify which pages or directories should be disallowed or allowed. For example, Disallow: /private/ would block access to the “private” directory, while Allow: /private/specific-page.html would allow access to a specific page within that directory.

  4. Include Sitemap: Add a reference to your sitemap by including a Sitemap: directive, such as Sitemap: https://www.yoursite.com/sitemap.xml, to ensure crawlers can find all your important pages.

  5. Save and Upload: Save the file as robots.txt and upload it to the root directory of your website (e.g., https://www.yoursite.com/robots.txt).

Common Mistakes to Avoid

When creating a Robots.txt file, it’s important to avoid common mistakes that could negatively impact your site’s SEO:

  • Misconfigured Directives: A common error is misconfiguring directives, such as placing a Disallow: / rule under the User-agent: *, which would block all crawlers from accessing your entire site. Always double-check your directives to ensure they are correctly written and applied.

  • Blocking Important Content: Another mistake is unintentionally blocking important content. For example, disallowing access to your wp-content/uploads/ directory on a WordPress site could prevent search engines from indexing valuable images and media. Be mindful of the content you block, as it could lead to a significant drop in search engine visibility if critical pages or resources are excluded.

By following these steps and being aware of potential pitfalls, you can create an effective Robots.txt file that enhances your site’s SEO performance and ensures search engines can efficiently crawl and index your content.

Configuring Robots.txt for SEO Optimization

Blocking Unwanted Pages

Effective Robots.txt configuration begins with identifying and blocking unwanted pages to optimize your site’s crawl efficiency and prevent unnecessary content from being indexed.

  • Preventing Duplicate Content: One of the key uses of Robots.txt is to prevent search engines from crawling and indexing duplicate content on your site. Duplicate content can harm your SEO by diluting the authority of your pages. For example, you might block URLs that generate the same content through different parameters or variations, such as print-friendly versions of pages (Disallow: /print/). This ensures that only the primary version of the content is indexed, preserving your page’s SEO strength.

  • Excluding Low-Value Pages: Low-value pages, such as admin sections, login pages, or thank-you pages, do not contribute to your SEO goals and can waste valuable crawl budget. By disallowing these pages in your Robots.txt file (Disallow: /admin/, Disallow: /login/), you direct search engines to focus on the content that matters most, enhancing the efficiency of your site’s crawling and indexing process.

Allowing Essential Pages

While blocking unwanted pages is crucial, it’s equally important to ensure that your essential content is accessible to search engines.

  • Ensuring Important Pages are Crawled: Use the Robots.txt file to guarantee that search engines can crawl and index your most important pages, such as your homepage, key product pages, and cornerstone content. By carefully structuring your Robots.txt file to allow access to these critical areas (Allow: /products/, Allow: /blog/), you help ensure that these pages are properly indexed and ranked by search engines.

  • Balancing Crawl Budget: Crawl budget refers to the number of pages a search engine will crawl on your site during a specific period. To optimize this budget, use Robots.txt to guide crawlers toward high-value pages and away from low-priority content. By strategically managing what is and isn’t crawled, you can make the most of your site’s crawl budget, ensuring that essential content is always crawled and indexed promptly.

Managing Dynamic Content

Dynamic content, such as pages with URL parameters, AJAX, or API-driven content, requires special consideration when configuring Robots.txt for SEO optimization.

  • Handling Parameters and Filters: URLs with parameters (e.g., ?sort=price) can create multiple versions of the same page, leading to inefficient crawling and potential duplicate content issues. Use Robots.txt to block or manage these URLs (Disallow: /*?sort=) while ensuring that the canonical version of the content remains accessible. This approach helps avoid unnecessary duplication in the index and preserves the integrity of your site’s SEO.

  • Efficiently Crawling AJAX and API Content: AJAX and API content can be challenging for search engines to crawl effectively. While Robots.txt cannot directly manage AJAX or API content, it can be used in conjunction with other SEO practices to ensure efficient crawling. For instance, you can use Robots.txt to block URLs that generate non-SEO-friendly AJAX content (Disallow: /ajax/). This helps search engines focus on static, indexable content while preserving the functionality of dynamic features.

You can significantly enhance your site’s SEO performance by carefully configuring your Robots.txt file to block unwanted pages, allow essential ones, and manage dynamic content.

Proper Robots.txt optimization ensures that search engines crawl your site efficiently, indexing the most valuable content and boosting your search engine rankings.

Testing and Validating Robots.txt

Testing and Validating Robots

Google Search Console

Testing and validating your Robots.txt file is crucial to ensure that it functions as intended, allowing search engines to crawl and index your site effectively.

  • Using the Robots.txt Tester: Google Search Console provides a handy tool called the Robots.txt Tester that allows you to check if your Robots.txt file is correctly blocking or allowing the intended URLs. To use this tool, simply navigate to the “Robots.txt Tester” section within Google Search Console. You can input specific URLs and see how Googlebot interprets the file. This helps you verify that important pages are accessible and that unwanted pages are correctly blocked. The tool also highlights any syntax errors in your Robots.txt file, making it easier to correct issues before they negatively impact your site’s SEO.

Other Testing Tools

In addition to Google’s own tools, third-party validation tools can offer additional insights and testing capabilities.

  • Third-Party Validation Tools: There are several third-party tools available that can help you validate your Robots.txt file, providing an extra layer of assurance. Tools like Screaming Frog and SEMrush offer Robots.txt analysis features that simulate how various search engines, not just Google, will interact with your Robots.txt file. These tools can identify issues that might not be apparent in Google Search Console, such as how Bingbot or other crawlers interpret your directives. This comprehensive testing ensures that your Robots.txt file is optimized across all search engines, not just Google.

Troubleshooting Common Issues

Even with careful planning, issues can arise in your Robots.txt file that need to be addressed to maintain optimal SEO performance.

  • Resolving Crawl Errors: One of the most common issues encountered is crawl errors, where search engines cannot access important content due to misconfigured directives. Crawl errors can be identified in both Google Search Console and third-party tools. Once detected, you’ll need to adjust your Robots.txt file to correct the directive causing the issue. This might involve removing or editing disallow rules that are blocking necessary content or restructuring the file for better clarity.

  • Ensuring Proper Implementation: Beyond resolving specific errors, it’s crucial to regularly audit your Robots.txt file to ensure it is properly implemented and aligned with your current SEO strategy. This involves checking that any recent site changes are reflected in the Robots.txt file, such as new sections of the site that need to be crawled or old sections that should now be blocked. Regular validation and testing help ensure that your Robots.txt file continues to support your SEO goals effectively as your site evolves.

By utilizing tools like Google Search Console’s Robots.txt Tester, along with third-party validation tools, and by troubleshooting common issues, you can ensure that your Robots.txt file is properly configured and functioning optimally.

This careful testing and validation process is essential for maintaining a strong SEO presence and ensuring that search engines can efficiently crawl and index your site.

Advanced Techniques

Conditional Rules for Different Bots

To fully optimize your Robots.txt file, you can create conditional rules tailored to different search engine bots.

  • Tailoring Rules for Googlebot, Bingbot, etc.: Different search engines use different bots to crawl websites, and each bot may have unique requirements. For instance, you might want Googlebot to access certain parts of your site that Bingbot or other crawlers shouldn’t. To achieve this, you can specify separate user-agent directives in your Robots.txt file. For example, you could allow Googlebot to crawl your image directories (User-agent: Googlebot, Allow: /images/), while restricting Bingbot from accessing the same area (User-agent: Bingbot, Disallow: /images/). This level of customization ensures that each bot crawls your site according to your SEO strategy, maximizing your site’s performance across different search engines.

Using Wildcards and Regular Expressions

Advanced pattern matching with wildcards and regular expressions allows for greater flexibility in your Robots.txt file, making it possible to manage complex URL structures.

  • Advanced Pattern Matching: Wildcards (*) and regular expressions can be powerful tools when you need to apply rules to a broad set of URLs. For example, if you want to block all URLs containing a certain query parameter, you might use a wildcard (Disallow: /*?sessionid=) to prevent search engines from crawling those pages. Similarly, regular expressions can be used for more precise control, such as blocking any URL that ends with a specific string (Disallow: /*.pdf$). These techniques are particularly useful for large websites with dynamic content, allowing you to efficiently manage how search engines interact with different parts of your site.

Integrating with Other SEO Tools

Integrating your Robots.txt file with other SEO tools and practices can further enhance its effectiveness and ensure that your site is fully optimized.

  • Combining with Sitemap and Meta Robots: To ensure comprehensive coverage, your Robots.txt file should work in tandem with your XML sitemap and Meta Robots tags. Including a link to your sitemap (Sitemap: http://www.example.com/sitemap.xml) in the Robots.txt file helps search engines discover all the important pages on your site, even those not linked directly in the Robots.txt file. Additionally, while Robots.txt controls what is crawled, Meta Robots tags (<meta name=”robots” content=”noindex, follow”>) can be used to manage what is indexed, adding an extra layer of control over your site’s SEO. This integration allows for a more nuanced approach to managing crawl and index behavior, ensuring that search engines have a clear understanding of your site’s structure and priorities.

By applying advanced techniques like conditional rules for different bots, using wildcards and regular expressions, and integrating Robots.txt with other SEO tools, you can achieve a highly customized and effective Robots.txt configuration.

These strategies ensure that your site is crawled and indexed in a way that aligns perfectly with your SEO goals, providing a competitive edge in search engine rankings.

Monitoring and Maintaining Robots.txt

Regular Audits

Maintaining an effective Robots.txt file requires regular audits to ensure it continues to serve your SEO strategy well.

  • Frequency and Best Practices: Regular audits of your Robots.txt file should be conducted at least quarterly, though monthly reviews are recommended for larger sites or those undergoing frequent changes. During these audits, you should check for any misconfigurations, ensure that the file aligns with your current SEO goals, and verify that no critical content is being inadvertently blocked. Best practices include using tools like Google Search Console’s Robots.txt Tester and third-party validation tools to identify any issues that might not be immediately obvious. Regular audits help prevent small errors from escalating into significant SEO problems, ensuring your Robots.txt file remains optimized over time.

Updating as Your Site Evolves

As your website grows and changes, your Robots.txt file should be updated to reflect these developments.

  • Adapting to Site Changes and Growth: As you add new sections, update old content, or restructure your website, it’s essential to revisit your Robots.txt file. For example, if you launch a new blog section, you’ll want to ensure that search engines are allowed to crawl and index it. Conversely, if certain pages become obsolete or are moved, you may need to adjust your Robots.txt file to block or allow these changes accordingly. Regularly updating the Robots.txt file in line with your site’s evolution ensures that search engines continue to crawl your site efficiently and that new content is indexed promptly.

Monitoring Search Engine Behavior

Understanding how search engines interact with your site is key to maintaining an effective Robots.txt file.

  • Analyzing Crawl Logs: Monitoring search engine behavior through the analysis of crawl logs provides valuable insights into how your site is being accessed. Crawl logs show you which pages are being crawled, how often they are visited by bots, and whether there are any errors in the process. By regularly reviewing these logs, you can identify issues such as unnecessary crawls of low-value pages, which could waste your crawl budget, or missed opportunities where important content is not being crawled. Adjusting your Robots.txt file based on these insights helps optimize search engine interaction with your site, ensuring that the right content is prioritized for crawling and indexing.

By conducting regular audits, updating the Robots.txt file as your site evolves, and closely monitoring search engine behavior through crawl logs, you can maintain a well-optimized Robots.txt file that continually supports your SEO strategy.

This proactive approach ensures that your site remains accessible and relevant to search engines, ultimately contributing to better rankings and improved visibility.

Summary: How to Create Robots.txt

To sum up, Robots.txt is a powerful SEO tool that gives you exact control over how search engines crawl and index your website.

You can control how visible and how well your site is crawled by knowing about its main parts, like user-agent directives, deny and allow rules, and other directives like crawl-delay and noindex.

Making and setting up a Robots.txt file needs careful thought, but there are tools and resources that can make the process easier.

If you don’t make common mistakes like misconfigured instructions or blocking important content, your SEO efforts will go smoothly.

It is important to regularly check and ensure that your Robots.txt file works by using Google Search Console and other validators to keep it working well.

Using more advanced methods, like making rules specific for different bots and connecting them to other SEO tools, can help you improve your plan even more.

But the work doesn’t end when everything is set up. It is essential to keep optimizing your site by doing regular surveys, making changes as your site grows, and keeping an eye on how search engines behave.

Your Robots.txt file must keep up with your website’s changes so that it continues to help your SEO goals and make your site more visible in search engine results.

If you stay proactive and make changes to your Robots.txt approach over time, you can keep your website well-optimized and performing at its best in the ever-changing world of search engine optimization.

FAQs: How to Create Robots.txt

Yes, robots.txt works effectively to guide search engine crawlers, though compliance depends on the crawler respecting the directives.

While not essential, robots.txt is useful for controlling crawl behavior, preventing duplicate content, and optimizing the crawl budget.

If you don’t use a robots.txt file, search engine crawlers will crawl and index all accessible parts of your website by default, which may not always align with your SEO goals.

Robots.txt itself does not directly improve site loading speed, but it can prevent crawlers from accessing non-essential pages, which may help reduce server load.

You can check if your robots.txt file is working by using tools like Google Search Console’s Robots.txt Tester or reviewing crawl logs to see if the directives are being followed.

Common mistakes include blocking important pages, using incorrect syntax, or misconfiguring directives that lead to unintended access issues.

Yes, you can use robots.txt to block specific search engines by specifying user-agent directives for those crawlers, such as User-agent: Googlebot followed by Disallow: /.

The Ultimate Guide to Heading Tag Optimization in 2024

Heading tags optimization has become an essential part of both search engine ranking and user experience in the ever-changing world of SEO.

Even though these HTML parts look like they shouldn’t do much, they do a lot to structure your content and make it easier for people to find and interesting to read.

But heading tags are important for more than just how they look. They help search engines figure out the order and usefulness of your content, which makes you more visible in search results.

This detailed guide will go over the basics of heading tag optimization, look at the best ways to do things, and show you more advanced ways to improve your SEO and user interaction in 2024.

If you’re new to SEO or an experienced pro, learning how to use heading tags can help your content reach new heights.

This will make it easier for your audience to find their way around your site and for search engines to index it correctly.

Come with us as we reveal the keys to effective heading tag optimization that will make your content stand out in the digital world.

Basics of Heading Tags

Header tags are essential HTML elements used to define the headings and subheadings within your web content, ranging from <h1> to <h6>.

They create a hierarchical structure that helps both search engines and users understand the importance and organization of your content.

The <h1> tag, typically used for the main title, is the most important heading, while <h2> to <h6> tags denote progressively less significant sections.

Properly utilizing this hierarchy is crucial for content organization, as it ensures that your information flows logically and is easy to navigate.

When crafting effective headings, clarity and relevance are paramount. Headings should accurately reflect the content of their respective sections, guiding readers through the material with ease.

Additionally, incorporating keywords strategically within your headings can significantly enhance SEO.

Keyword placement should be natural and relevant, avoiding the pitfalls of keyword stuffing which can harm readability and search engine rankings.

By adhering to these best practices, you can create headings that improve user experience and boost your site’s visibility and performance in search results.

Why Header Tags Are Important For SEO

Header tags are vital for SEO because they help search engines understand the structure and context of your content.

By clearly delineating sections with <h1> through <h6> tags, you signal the hierarchy and importance of your information. Search engines like Google use this hierarchy to index your content accurately, influencing how well your pages rank in search results.

Properly optimized header tags can improve the visibility of your keywords, making it easier for search engines to match your content with relevant search queries.

Additionally, well-structured header tags enhance user experience by breaking up your content into digestible sections, which can lead to longer dwell times and lower bounce rates.

This user engagement is another positive signal to search engines, further boosting your SEO performance.

In essence, header tags are a dual-purpose tool that enhance both the discoverability of your content by search engines and the overall user experience.

Technical Aspects of Heading Tags

Technical Aspects of Heading Tags

Understanding the technical aspects of heading tags is crucial for effective heading tag optimization. At the core, heading tags are defined using simple HTML syntax.

For instance, <h1>, <h2>, <h3>, and so on, are used to denote headings of decreasing importance.

This straightforward syntax helps establish a clear hierarchy within your content, making it easier for both users and search engines to follow the structure of your page.

Styling these headings with CSS enhances their visual appeal and consistency across your website.

Best practices for CSS styling include:

  • Using relative units like em or rem for font sizes to ensure responsiveness.
  • Setting appropriate margins to maintain a clean layout.
  • Applying contrasting colors to ensure readability.

Accessibility considerations are also paramount when it comes to heading tags. Ensuring headings are accessible to all users involves using semantic HTML to maintain a logical flow and structure, which screen readers and other assistive technologies rely on to navigate your content.

Additionally, employing ARIA (Accessible Rich Internet Applications) landmarks and attributes can further enhance accessibility.

For example, using role=”headingalong with aria-level attributes can provide explicit information about the heading levels to assistive technologies, ensuring that users with disabilities can effectively interpret and navigate your content.

By focusing on these technical and accessibility aspects, you ensure that your heading tags not only contribute to better SEO but also create a more inclusive and user-friendly experience.

SEO Benefits of Proper Heading Tag Use

Proper use of heading tags brings substantial SEO benefits by improving search engine visibility and enhancing user experience and engagement.

Search engines interpret headings to understand the structure and context of your content.

By clearly defining the hierarchy with <h1> to <h6> tags, you help search engines identify the main topics and subtopics, which in turn aids in accurate indexing and ranking of your pages.

Headings also play a crucial role in SEO ranking factors, as they help highlight the relevance of keywords and phrases within your content.

Well-optimized headings that incorporate targeted keywords can boost your chances of appearing higher in search results.

In addition to aiding search engines, proper heading tag use significantly enhances user experience and engagement.

Structured content with clear, descriptive headings guides readers through your material, making it easier to navigate and understand.

This logical flow increases readability, which can lead to longer dwell times on your page and a reduced bounce rate.

Users are more likely to stay engaged with well-organized and easy-to-follow content, ultimately contributing to better SEO performance.

By focusing on both search engine and user needs, you can leverage heading tags to maximize your content’s effectiveness and reach.

Advanced Heading Tag Strategies

Advanced Heading Tag Optimization Strategies

Advanced heading tag strategies involve leveraging semantic structuring and optimizing for featured snippets to enhance both SEO and user experience.

Using headings to define content hierarchy is fundamental to semantic structuring.

This involves not only organizing content logically with <h1> to <h6> tags but also incorporating semantic HTML5 elements like <section>, <article>, and <aside> to provide additional context and meaning.

These elements work in tandem with heading tags to create a clear and comprehensive structure that search engines can easily interpret, which can improve your site’s search visibility.

Optimizing for featured snippets requires a strategic approach to structuring your content. Featured snippets are brief, highlighted excerpts that appear at the top of Google search results, and they often pull information from well-structured content.

Use clear and concise headings that directly address common questions or topics within your niche to increase the chances of your content appearing in these coveted spots.

Additionally, headings play a crucial role in rich snippets, which provide more detailed information about your page.

By using descriptive and keyword-rich headings, you can enhance the likelihood of your content being featured as a rich snippet, boosting visibility and attracting more clicks from users.

Implementing these advanced strategies can significantly improve your site’s SEO performance and make your content more accessible and engaging for your audience.

How to Do Heading Tag Optimization: SEO Best Practices

Optimizing heading tags for SEO involves several best practices that can enhance both search engine visibility and user experience.

First, use your headers to structure your content effectively. Begin with a single <h1> tag for the main title, and use <h2> to <h6> tags to create a clear hierarchy for subtopics and detailed sections.

This organization helps search engines and readers navigate your content easily.

Incorporating relevant keywords into your header tags is crucial for SEO. Place keywords naturally within your headings to improve search engine indexing and effectively match user queries.

However, avoid keyword stuffing, as it can detract from readability and may be penalized by search engines.

Optimizing for featured snippets involves crafting concise, informative headings that directly answer common questions or summarize key points.

Clear and well-structured headings increase the likelihood of your content being selected for these prominent search result features.

Adhere to the guideline of using only one <h1> tag per page to denote the main topic, as multiple <h1> tags can confuse search engines and dilute the focus of your content.

Avoid using heading tags purely for styling purposes, such as changing font size. Instead, use CSS for styling and keep heading tags for structuring content.

Finally, ensure paragraphs are not assigned heading tags. Headings should introduce sections or key points, while paragraphs should contain the detailed information under those headings.

Following these best practices ensures your heading tags contribute positively to your SEO strategy and enhance the overall user experience on your site.

Common Mistakes and How to Avoid Them

When optimizing heading tags, it’s important to be aware of common mistakes and how to avoid them. One prevalent error is overusing keywords, also known as keyword stuffing.

While including keywords in your headings is essential for SEO, stuffing them excessively can lead to penalties from search engines and reduce the readability of your content.

The key is to balance keywords with natural language, ensuring that your headings remain clear and informative. Aim to use keywords where they naturally fit within the context, enhancing the flow and comprehension of your content.

Another common mistake is maintaining inconsistent heading structures across your website. Inconsistency can confuse both readers and search engines, disrupting the logical flow of information.

To ensure consistency, adhere to a standardized hierarchy of headings (<h1> to <h6>) throughout your site. Each page should have a single <h1> tag, followed by appropriately nested subheadings.

Avoid common structural errors such as skipping heading levels (e.g., jumping from <h1> to <h3> without an <h2>) or using headings for decorative purposes rather than content organization.

By maintaining a consistent and logical heading structure, you improve the navigability of your site and enhance its SEO performance, providing a better experience for both users and search engines.

Tools and Resources for Heading Tag Optimization

To master heading tag optimization, leveraging the right tools and resources is essential. Several SEO tools are specifically designed for analyzing headings and optimizing their use.

Tools like Ahrefs, SEMrush, and Moz offer comprehensive heading analysis features. These tools can audit your website to identify issues with heading structures, keyword usage, and consistency.

For instance, Ahrefs can help you analyze the distribution and effectiveness of your headings, while SEMrush provides insights into how well your headings align with SEO best practices.

Moz’s tools can assist in ensuring your headings are appropriately keyword-optimized and hierarchically structured.

Using these tools effectively involves regular audits and adjustments. Start by running an initial analysis to identify any structural errors or missed opportunities in your headings.

Use the insights provided to optimize your headings for better SEO performance, such as refining keyword placement and ensuring a logical hierarchy. Regularly monitor the impact of these changes and make iterative improvements based on updated analysis reports.

In addition to tools, various learning resources can deepen your understanding of heading tag optimization.

Recommended courses from platforms like Coursera, Udemy, and LinkedIn Learning offer in-depth guides on HTML, CSS, and SEO principles.

These courses can help you master the technical and strategic aspects of heading tags. Moreover, staying updated with the latest trends is crucial, as SEO best practices evolve constantly.

Follow reputable SEO blogs, attend webinars, and participate in industry forums to keep abreast of new strategies and tools.

Combining the right tools with continuous learning ensures that your heading tag optimization remains effective and up-to-date.

Conclusion: Heading Tag Optimization

Mastering heading tag optimization is essential for improving both SEO performance and user experience on your website.

Recapping the best practices and strategies discussed in this guide, start by understanding the basics of heading tags and their hierarchical structure.

Use a single <h1> tag for the main title, followed by <h2> to <h6> tags to create a logical and organized content hierarchy. Craft effective headings that are clear, relevant, and naturally incorporate keywords to enhance readability and search engine visibility.

Pay attention to the technical aspects of heading tags, including proper HTML syntax and CSS styling, to ensure your headings are visually appealing and accessible.

Utilize ARIA landmarks and attributes to make your content accessible to all users. Leverage advanced strategies like semantic structuring and optimizing for featured snippets to further boost your SEO efforts.

Avoid common mistakes such as keyword stuffing and inconsistent heading structures by maintaining a balanced and logical approach.

Employ SEO tools like Ahrefs, SEMrush, and Moz to analyze and optimize your headings, and continuously update your knowledge through recommended courses and industry trends.

By following these best practices and strategies, you can effectively optimize your heading tags, improving your site’s search engine rankings and providing a better experience for your users.

Mastering heading tag optimization will not only enhance your website’s SEO but also ensure that your content is well-organized, accessible, and engaging for all readers.

FAQS: Heading Tag Optimization

While traditionally it was advised to use only one <h1> tag per page, modern HTML5 allows multiple <h1> tags if they are used within separate sections or articles to denote distinct topics.

Heading tags help structure content, making it easier for mobile users to navigate and read your pages. Properly used headings improve usability, which can positively impact mobile SEO.

Common mistakes include:

  • Overusing keywords (keyword stuffing).
  • Inconsistent heading structures.
  • Using headings for styling purposes.

Not maintaining a logical hierarchy.

Update your heading tags whenever you make significant changes to content or SEO strategies, or when you notice shifts in keyword trends or user behavior.

Optimize your <h1> tag by including relevant keywords, making it descriptive of the page content, and ensuring it accurately reflects the main topic of the page.

On a landing page, optimize the <h1> tag by including primary keywords, making it compelling and relevant to the content, and ensuring it aligns with the page’s call-to-action.

Discover Expert Tips for Image Optimization in SEO for 2024

Welcome to our complete guide on image optimization in SEO for 2024.

Regarding SEO, one thing is always clear: images are more than just visual support; they are powerful tools for making your website more visible and engaging.

In this guide, we’ll show you how important images are for SEO success. Optimizing your images is not only a good idea; it’s necessary.

Optimizing your images will not only enhance the user experience and speed up page loads, but it will also catapult you to higher rankings in search engines. These benefits should excite you about the potential improvements to your website’s visibility and engagement.

Join us on this journey as we delve into the intricacies of image SEO. Together, we’ll learn expert tips and tricks to ensure your images stand out online.

Table of Contents

Basics of Image Optimization in SEO

Image Optimization in SEO

If you want to improve your search engine optimization (SEO), you may need to change some of the pictures on your website so that search engines can find and show them more easily.

First, you need to know how to optimize pictures to look good and fit well with the text they’re next to.

Search engines usually look at photo alt text, titles, and captions. Alt text, also called “alternative text,” tells you what a picture is about and how it appears on the page.

It’s essential for SEO and ease of use. Titles and subtitles add to the image’s meaning and context. Search engines use this text to figure out what images are about.

This makes it more likely that the pictures will be correctly indexed for queries that are connected to them.

Here are some things you need to check to ensure that these factors align with your target keywords and that your images are formatted and compressed correctly to load faster without losing quality.

Technical Aspects of Image Optimization

Image optimization is crucial for enhancing SEO and providing a better user experience.

Here’s a detailed look at the technical aspects of image optimization:

Choosing the Right Image Formats

You must first choose the right image format for image optimization to work.

The most popular file types are JPEG, PNG, and WebP. Each has pros and cons. JPEG is great for photos and other complex images because it can handle millions of colors and obtain smaller file sizes through lossy compression.

This compression, on the other hand, can sometimes cause grade loss.

Because it doesn’t lose any quality, PNG is great for images like logos and icons that need to be clear and have sharp edges.

One bad thing about PNG files is that they can be much bigger than JPEGs.

WebP is a relatively new format that lets you get the best of both worlds by compressing and displaying pictures better for both photos and graphics.

The biggest problem is that not all browsers can use it, but this is improving.

Optimizing Image File Sizes

A critical part of image optimization is reducing image file size without losing quality.

People often use methods like perfect and lossy compression. Lossless compression removes unnecessary data in a file to make it smaller without affecting the quality.

This makes it good for PNG files. This is a great job for tools like PNGGauntlet and ImageOptim.

Lossy compression, which is mostly used for JPEG and WebP, shrinks files by throwing away some picture data.

This may slightly lower the quality but makes the files much smaller. Tools like TinyJPEG and Google’s WebP translator can do this.

When you use vector images like SVGs for simple graphics, you can make sure that the files are small without losing quality at any level.

Image Dimensions and Resolution

Making sure that images are the right size for different screen resolutions and devices is important for both speed and aesthetics.

Pages that have a lot of high-resolution images can take a long time to load, especially on phones.

As a best practice, you should resize images to the largest size they will be used on and use the right resolution.

For example, a retina monitor might need twice as high images as usual.

You can easily change the size of an image with programs like Photoshop or online services like Canva.

Also, making sure that the sizes of the pictures you serve are right for your website’s design layout will make sure that they look clear without using too much bandwidth on extra pixel data.

Implementing Responsive Images

Responsive images adapt to different screen sizes and resolutions, improving load times and user experience across devices.

The srcset attribute in HTML5 is instrumental in this, allowing the browser to choose the most appropriate image based on the device’s screen size and resolution.

By specifying multiple image sources with different widths, the browser can download the smallest image necessary for the current display, thereby saving bandwidth and improving load times.

For instance, an img tag might include srcset= “image-320w.jpg 320w, image-640w.jpg 640w, image-1280w.jpg 1280w”, enabling the browser to select the best fit.

Combining srcset with the sizes attribute, which defines the image’s display size, ensures that images are always optimized for the user’s device.

On-Page Image SEO Techniques

On Page Image SEO

Optimizing images on your webpage goes beyond technical adjustments.

Implementing on-page SEO techniques can significantly enhance your site’s search engine rankings and user engagement.

Here’s how:

Crafting Effective Alt Text

Alt text does two things: it makes your website easier for people who are blind or have low vision to use, and it helps search engines figure out what your pictures are about.

To write good alt text, make sure it describes something and naturally includes keywords that are important. You could use “Golden retriever puppy playing in the garden” instead of a generic alt text like “image1.jpg.”

This not only gives background information, but it also fits with possible search terms.

Search engines may punish you for phrase stuffing, so don’t do it.

To make sure that screen readers and search engine bots can easily read your alt text, keep it short—ideally under 125 characters.

Optimizing Image File Names

Descriptive file names are crucial for image SEO.

Search engines use file names to understand the content of the images, much like alt text.

Instead of default names like “IMG_1234.jpg,” rename your files with descriptive, keyword-rich names, such as “golden-retriever-puppy-garden.jpg.”

Use hyphens to separate words, as search engines read hyphens as spaces, and avoid underscores, which are not interpreted the same way.

This practice not only helps in better indexing by search engines but also improves the image’s discoverability in image search results.

Utilizing Captions and Titles

Captions and titles provide additional context for images and can enhance both user experience and SEO value.

Captions, which appear below images, are often read more than the main body text, making them a prime spot to include relevant keywords naturally.

For example, a caption for the golden retriever image could be “A playful golden retriever puppy enjoying a sunny day in the garden.”

This reinforces the image’s context and relevance. Titles, on the other hand, provide supplementary information when a user hovers over the image.

While not directly impactful on SEO, well-crafted titles can improve user interaction and engagement.

Combining these elements ensures your images are informative and engaging, contributing positively to your site’s SEO.

Advanced Image SEO Strategies

To stay ahead in the competitive landscape of 2024, implementing advanced image SEO strategies can significantly enhance your website’s performance and search engine rankings.

Here’s an in-depth look at key techniques:

Leveraging Structured Data for Images

Structured data, particularly schema markup, can provide search engines with explicit information about your images, improving their visibility and searchability.

By using the ImageObject schema, you can include details such as the image’s URL, caption, and licensing information.

For example, adding schema markup for an image of a golden retriever might look like this:

{
“@context”: “https://schema.org/”,
“@type”: “ImageObject”,
“contentUrl”: “https://example.com/images/golden-retriever-puppy.jpg”,
“caption”: “A playful golden retriever puppy in the garden”,
“license”: “https://example.com/license”
}

This structured data helps search engines understand the content and context of your images better, potentially leading to enhanced display in image search results and rich snippets.

Image Sitemaps

Creating and submitting image sitemaps to Google is an effective way to ensure all your images are indexed.

An image sitemap provides search engines with a list of images on your site, along with metadata such as the image’s location, caption, and title.

This can be especially useful for sites with large volumes of images. To create an image sitemap, you can use tools like Screaming Frog or XML-Sitemaps.com, or manually create one by adding the following to your existing sitemap:

<url>
<loc>https://example.com/page-with-image</loc>
<image:image>
<image:loc>https://example.com/images/golden-retriever-puppy.jpg</image:loc>
<image:caption>A playful golden retriever puppy in the garden</image:caption>
<image:title>Golden Retriever Puppy</image:title>
</image:image>
</url>

After creating the image sitemap, submit it to Google Search Console to ensure your images are effectively crawled and indexed.

Using Content Delivery Networks (CDNs)

Content Delivery Networks (CDNs) distribute your image content across multiple servers globally, significantly improving loading speeds by serving images from the server closest to the user.

This not only enhances user experience but also positively impacts SEO, as page load speed is a critical ranking factor.

CDNs like Cloudflare, Akamai, and Amazon CloudFront offer robust solutions for image delivery.

By leveraging a CDN, your images load faster, reducing bounce rates and improving overall site performance.

Additionally, CDNs often provide features like automatic image optimization and resizing, further enhancing image loading efficiency.

Enhancing User Experience with Images

Images play a crucial role in engaging users and enhancing the overall experience on your website.

Here’s how you can optimize image use to ensure a superior user experience:

Image Placement and Context

Putting images in your content in a smart way can make it much easier to read and keep people interested.

Putting images next to important text will give it more visual context and break up long blocks of text, which will make the content easier to read.

For instance, a piece of writing about gardening tips might benefit from having pictures of tools, plants, and fields next to the text.

To keep the layout looking clean and professional, make sure the images are lined up correctly, whether they are on the left, right, or center.

Using images to explain complicated ideas or data through infographics can also help people understand your content better and make it look better.

Ensuring Accessibility

Not only is it the right thing to do, but it’s also necessary to make sure that all users can see pictures.

Make sure that people who are blind or have low vision can understand what images are showing by using detailed alt text.

Also, think about using high-contrast pictures to make them easier to see, and don’t rely on images alone to get your point across.

Adding ARIA (Accessible Rich Internet Applications) jobs and landmarks can make things even easier for people with disabilities to use.

As an example, adding aria-label to picture links gives more information.

Use tools like WAVE or Axe to check your site’s usability on a regular basis. This will help you find and fix any problems.

A/B Testing Images

In A/B testing images, you look at two copies of a page that have different images and see which one gets more users to interact with it and make a purchase.

For A/B testing, you can change things like picture types (like photos vs. illustrations), placements, sizes, and styles.

You can make this testing easier with tools like Google Optimize, Optimizely, or VWO that let you make variants and track success metrics like click-through rates, bounce rates, and conversion rates.

For example, you could see if a picture of a happy customer using your product gets more attention than an image of the product itself.

By looking at these results, you can pick the best images, which will lead to better user happiness and interaction.

Checklist: How to Optimize Images for SEO

Optimizing images for SEO involves a series of strategic steps that enhance both visibility and performance.

Here’s a comprehensive guide covering key aspects:

Find or Create Useful Images

Start by sourcing or creating high-quality images that add value to your content.

Original images are preferred over stock photos as they are unique and can better illustrate your specific points.

Choose the Right Image Formats

Select appropriate image formats based on the type of image.

JPEG is suitable for photographs due to its good balance between quality and file size, PNG is ideal for graphics requiring transparency, and WebP offers superior compression for both types.

Make Images Mobile-Friendly

Ensure your images are optimized for mobile devices by using responsive design techniques.

This includes adjusting image dimensions and using the srcset attribute to serve different image sizes based on the user’s device.

Give Your Images Descriptive File Names

Rename your image files with descriptive, keyword-rich names.

Instead of “IMG1234.jpg,” use “golden-retriever-puppy-garden.jpg” to help search engines understand the image content.

Add Descriptive Alt Text

Craft concise and descriptive alt text that includes relevant keywords.

This improves accessibility and helps search engines index your images. For example, use “A playful golden retriever puppy in a sunny garden.”

Include Captions

Use captions to provide additional context and enhance the user experience.

Captions are often read more than body text, making them valuable for SEO and engagement.

Resize Images

Adjust the dimensions of your images to match their display size on the web page.

This reduces file size and improves load times. Tools like Photoshop or online resizers can help with this.

Compress Images

Use compression tools to reduce file sizes without sacrificing quality.

Tools like TinyPNG or JPEG-Optimizer can significantly decrease loading times and save bandwidth.

Use Responsive Image Scaling

Implement responsive images using the srcset and sizes attributes.

This allows browsers to select the most appropriate image size based on the device’s resolution and screen size.

Implement Lazy Loading

Enable lazy loading to delay the loading of off-screen images until they are needed.
This improves initial page load times and reduces bandwidth consumption. Implement this using the loading=”lazy” attribute in your img tags.

Create an Image Sitemap

Generate an image sitemap to help search engines discover and index your images.
Include URLs and metadata like captions and titles. Submit the sitemap to Google Search Console.

Use a Content Delivery Network

Distribute your images through a Content Delivery Network (CDN) to reduce loading times by serving images from the server closest to the user.

CDNs like Cloudflare and Amazon CloudFront offer robust solutions.

Enable Browser Caching

Set up browser caching to store images locally on users’ devices, reducing load times for returning visitors.

Use cache-control headers to specify how long images should be cached.

Apply On-Page SEO Best Practices

Incorporate on-page SEO techniques such as placing images near relevant text, using structured data, and ensuring your images enhance the overall content strategy.

Add Image Structured Data

Use schema markup to provide additional information about your images to search engines.

The ImageObject schema can include details like URL, caption, and licensing information, helping improve visibility in search results.

Optimize Your Open Graph Meta Tags

Optimize Open Graph meta tags to ensure your images display correctly when shared on social media platforms. Specify the image URL, type, and dimensions in your HTML head section.

By following these detailed steps, you can effectively optimize your images for SEO in 2024, improving both search engine rankings and user experience.

Keeping Up with Trends

Staying ahead in image optimization for SEO requires keeping up with the latest trends and technological advancements:

AI and Machine Learning in Image SEO

AI and machine learning are revolutionizing image recognition and SEO.

These technologies enable search engines to better understand image content through advanced algorithms that analyze visual elements like objects, colors, and patterns.

This improved understanding helps in delivering more relevant search results.

Leveraging AI-driven tools can enhance your image SEO by automating tasks such as generating alt text, tagging, and even optimizing image quality based on user preferences.

Visual Search Optimization

With the rise of visual search engines like Google Lens and Pinterest Lens, optimizing for visual search is becoming crucial. Preparing for this trend involves ensuring your images are high-quality, relevant, and tagged with accurate metadata.

Implementing structured data helps search engines recognize and categorize images effectively.

Additionally, focus on creating visually rich content that stands out, as this will increase the chances of your images being picked up in visual searches.

The Role of High-Quality Visual Content

Investing in professional photography and graphics is essential for maintaining high-quality visual content.

High-resolution, professionally crafted images not only enhance the aesthetic appeal of your website but also contribute to better user engagement and retention.

As search engines increasingly prioritize user experience, having top-notch visual content can significantly boost your SEO efforts.

Consider hiring professional photographers or graphic designers to create unique and compelling visuals that align with your brand and content strategy.

Monitoring and Measuring Success

Effectively monitoring and measuring the success of your image optimization efforts is crucial for ensuring long-term SEO performance:

Tracking Image SEO Performance

Utilizing the right tools and metrics is essential for gauging the effectiveness of your image optimization strategies.

Google Analytics and Google Search Console are invaluable for tracking image-related metrics such as organic traffic, click-through rates, and user engagement.

Google Search Console’s “Performance” report can show you how well your images are ranking in search results and provide insights into impressions and clicks.

Additionally, tools like SEMrush and Ahrefs can help analyze backlinks to your images and overall image SEO performance.

Pay attention to metrics such as image load time, bounce rates, and conversion rates to get a comprehensive view of your image optimization impact.

Continuous Improvement

SEO is an ever-evolving field, with search engine algorithms and best practices constantly changing. To stay ahead, it’s important to continuously improve your image optimization techniques.

Regularly update your knowledge by following SEO news, attending webinars, and participating in industry forums.

Perform periodic audits of your image SEO strategy to identify areas for improvement and implement changes accordingly.

Tools like Screaming Frog can help you conduct comprehensive audits to ensure all aspects of your image optimization are up-to-date.

Staying proactive and adaptable will help you maintain and enhance your image SEO success over time.

By tracking performance with the right tools and metrics, and staying current with algorithm changes and best practices, you can ensure your image optimization efforts are effective and continually improving.

Conclusion:  Image Optimization in SEO

To sum up, mastering image optimization in SEO requires a multifaceted approach that includes technical precision, strategic on-page techniques, and a close attention to how trends are changing.

Learn the basics first by learning how search engines read pictures and how important things like alt text, titles, and captions are.

Pick the right picture formats, make sure your file sizes are as small as possible, and make sure your images work well on mobile devices.

In order to improve your picture SEO even more, you should use advanced techniques like structured data, image sitemaps, and content delivery networks (CDNs).

To improve the user experience, place images carefully, make sure they are easy for everyone to access, and do regular A/B testing to see what works best.

It is important to keep up with trends, such as how AI is changing picture recognition and the rise of visual search engines.

To stay ahead of the competition, you should spend money on high-quality visual material and keep an eye on and improve your strategies all the time.

It’s possible that AI and machine learning will be used more and more in image optimization in SEO in the future to make image recognition and search more advanced.

As visual search grows, it will be important to make sure your site works well on these devices.

As time goes on, more and more people will care about high-quality, original visual material.

For SEO success, you need professional photography and graphics.
You can make sure your images are optimized for maximum SEO impact by following these expert tips and keeping open to new technologies and trends.

This will bring more traffic and engagement to your website in 2024 and beyond.

FAQs: Image Optimization in SEO

Regularly, at least every 6-12 months, or when major algorithm updates occur.

Yes, optimizing images reduces file sizes and improves load times.

Avoid using non-descriptive file names, neglecting alt text, failing to compress images, and not using responsive images.

Image SEO is the practice of optimizing images to improve their visibility and ranking in search engine results.

Images can appear in web search results, image search results, and as thumbnails in rich snippets.

Unlock Content Optimization Hacks to Skyrocket Your Traffic

In the digital world, content optimization is more critical than ever. It’s not enough to write great content; you must also ensure that it reaches the right people and performs well in search engines.


You can get a lot of visitors and build a strong online profile if you know how to use certain content optimization tricks.


This comprehensive guide will teach you the basics of content optimization and give you tips and ideas for improving your content.


Understanding why content improvement is crucial and how to use tried-and-true methods to make your site more visible and attract more visitors is key to your online success.


Let’s get started!

What Is Content Optimization

Content optimization is the strategic process of enhancing your content to make it more appealing, discoverable, and valuable to both your audience and search engines.


It includes smartly using keywords, making the content easier to read, ensuring it is relevant, and adding multimedia elements like videos, images, and infographics.


Content optimization aims to make your content more visible in search engine results pages (SERPs), encourage more interaction with it, and eventually increase traffic to your site.


You can make your online presence more interesting and powerful by ensuring your content fits your target audience’s wants and needs while following SEO best practices.

Why Is Content Optimization Important?

Why Is Content Optimization Important

Content optimization is very important because it has a direct effect on how well and how visible your content is.

People who are interested in what you have to say are more likely to find it because optimized material ranks higher in search engine results.

This makes your site more visible, which brings you more free traffic, which is cheaper and lasts longer than paid ads.

Well-optimized content also improves the user experience by making information more useful, interesting, and easy to read.

This keeps people on your site longer and lowers the number of people who leave right away.

Ultimately, content optimization helps you become an expert and credible in your area.

It also builds trust among your audience and leads to more sales, which all adds to the overall success of your digital marketing.

Types of Content Optimization

Different kinds of content improvement are meant to improve different parts of your content.

For better search engine rankings and readability, on-page optimization works on things in your content, like how you use keywords, meta tags, and formatting.

Technical optimization includes:

  • Making the site faster.
  • Make sure it works well on mobile devices.
  • Making it easier for search engines to crawl and analyze.

Optimizing your user experience (UX) means adding multimedia elements like images, videos, and infographics to your material to make it more exciting and easy for people to find.

Distribution optimization also includes planning how to share and promote your content on email marketing, social media, and other outlets to get the most people to see and interact.

Each type is essential for building a complete content plan that attracts people to your site and increases its visibility.

Vital Elements to Content Optimization

Vital Elements to Content Optimization

I. Research and Planning

The first steps in content optimization are research and planning. These ensure your content speaks to the right people and does well in search engines.

To find your target audience, you must first create an ideal reader persona, a detailed profile of your perfect reader that includes their demographics, hobbies, pain points, and online behavior.

To make this process even better, you need to know what kind of material your audience wants, what problems they need help with, and how they like to be communicated with.

Another essential part is keyword research. Use tools like Google Keyword Planner, Ahrefs, or SEMrush to find high-performing keywords related to your niche.

You should also look for long-tail keywords in this study. These are more specific and usually not as competitive as short-tail keywords.

This will help you rank higher and attract a very specific audience.

When you do a competitor study, you look at the best-performing content in your niche to see what your competitors are doing right.

This means looking at their content themes, how they use keywords, and how they get people to interact with their content.

Using the tactics that your competitors use for their content can give you useful information and ideas that will help you make even better, more effective content that stands out in your field.

By doing a lot of study and planning ahead, you build a strong base for making optimized content that gets a lot of traffic and engagement.

II. Content Creation

The creation of content is an important part of content optimization.

It requires planning how to write catchy headlines, create high-quality content, and include visual elements.

Question marks, numbers, and strong words are all effective ways to get people’s attention.

A good headline not only gets people to read more but also has a big effect on click-through rates, which tell you whether people will read your material or scroll past it.

The next important step is to create high-quality material. This means making sure that the material you write is useful and relevant to the people you want to reach, meeting their needs and fixing their issues.

To build trust and credibility, you need to write clearly and with authority.

This will make your writing not only informative but also interesting and simple to understand.

Adding images, infographics, and videos, among other visual elements, can make your material much more appealing.

Visual aids break up writing, which makes it easier to understand and more interesting.

They also give you more ways to share information. Using images well can help people remember your content and improve the whole experience, making it more likely to be shared.

By paying attention to these parts of writing content, you can customize content that gets people’s attention, keeps them interested, and brings more people to your site.

III. On-Page Optimization

On-page optimization is a must if you want your content to show up higher in search results and work better.

Formatting that is good for SEO is a very important part of this process. You can make your content easier to read and manage by using headers, bullet points, and short paragraphs.

This not only makes the experience better for users but also helps search engines understand how your content is structured and arranged.

Also, you can’t say enough good things about meta tags and descriptions. They give search engines important information about your content and can have a big effect on click-through rates by giving users an interesting peek.

Linking to relevant articles or pages on your website is an important part of internal linking strategies because it helps your content make sense.

This not only helps people find more information, but it also makes it easier for search engines to crawl and scan your site.

When you link to relevant content, your site’s navigation gets better, people stay on your site longer, and search engines see your site as more thorough and useful, which boosts its authority.

Another important part of on-page optimization is making sure that it works well on mobile devices.

To make sure your material is mobile-friendly, it needs to be easy to read and access on a range of devices, such as smartphones and tablets.

Responsive design is important because it can change the layout of your content instantly based on the screen size.

This way, users can have a smooth experience no matter what device they are using.

This not only makes the experience better for users, but it also helps your search engine results because Google’s ranking algorithm takes mobile-friendliness into account.

By paying attention to these on-page optimization tips, you can make content that is good for both people and search engines, which will bring more people to your site.

IV. Technical SEO

Technical SEO

Technical SEO is an important part of content optimization. It focuses on making your website’s technical parts better so that it does better in search engine results.

Making pages load faster is important because faster websites are better for users and search engines like them.

Some ways to speed up a website are to optimize images, use browser caching, and make HTTP calls as small as possible.

Tools like Google PageSpeed Insights, GTmetrix, and Pingdom can help you check load times and give you suggestions on how to make things better.

For search engines to find and rank your content, you need to make sure it can be crawled and indexed.

You can tell search engines what parts of your site they can crawl by using robots.txt files. XML sitemaps, on the other hand, help them figure out how your site is structured and find all the important pages.

By sending your sitemap to search engines like Google Search Console, you can be sure that your information will be indexed quickly and correctly.

Another important part of technical SEO is fixing broken links. Users can have a bad experience and your SEO will suffer if you have broken links.

Finding and fixing broken links means checking your website for them on a daily basis and updating or getting rid of them as needed.

You can keep an eye on the health of your links and make sure the user experience is smooth with tools like Screaming Frog, Ahrefs, and Google Search Console.

By taking care of these basic SEO issues, you can build a strong base for your content that search engines and users will both find useful and appealing.

V. Content Distribution

Spreading your optimized content across different platforms is important for getting it to as many people as possible and having the most impact.

Sharing your information on social media sites like Facebook, Twitter, Instagram, and LinkedIn is part of using them to reach more people.

Responding to comments, asking questions, and pushing followers to share helps you get more people to see and interact with your content, which brings more people back to your website.

Using email marketing is another powerful way to get your information out there.

When you send emails that are useful and interesting to your audience, they are more likely to be opened and clicked on.

Using opt-in forms, lead magnets, and personalized content to build a loyal user base helps keep relationships alive and gets people to come back to your site more often.

Working with influential people can help your work get seen by a lot more people.

When you work with influencers in your area who have a big, active following, you can reach their audience and gain credibility through their support.

To use influencer marketing effectively, you need to find the right influencers, build real relationships with them, and make content that fits both your business and their audience.

By strategically distributing your content through social media, email marketing, and influencer partnerships, you can reach your content optimization goals, build brand recognition, and attract targeted traffic.

VI. Monitoring and Analysis

Monitoring and analyzing are important parts of content optimization because they help you see how well your efforts are working and help you make decisions that will improve your content strategy based on data.

To keep an eye on the success of your content, you need to keep an eye on engagement metrics like time on page and social shares, as well as key metrics like traffic sources, page views, and bounce rates.

These metrics show how well your content connects with your readers and how it affects the performance of your website as a whole.

Tools like Google Analytics, SEMrush, and Moz let you do a lot of different kinds of data analysis, so you can keep track of and understand these measures well.

Using monitoring data to improve your content methods is a great way to keep getting better.

Metric analysis helps you figure out what’s going well and what could be done better. This could mean changing the topics of material, making keywords more relevant, updating old information, or making the user experience better based on what was learned.

As search engine algorithms change, which affects how content is found and ranked, it’s important to keep up with SEO trends and changes in the industry.

By changing your plans to fit these trends, you can keep or even increase the exposure and usefulness of your content over time.

By incorporating strong monitoring and analysis methods into your content optimization strategy, you can accurately track results, improve your strategies, and stay ahead in the digital world, which will eventually lead to long-term increases in website traffic and engagement.

Content Optimization for SEO

Content optimization for SEO involves several strategic elements to ensure your content not only ranks well in search engines but also engages and satisfies your audience.

Target Relevant Keywords with Traffic Potential: Start by conducting thorough keyword research using tools like Google Keyword Planner or SEMrush to identify keywords that are relevant to your topic and have sufficient search volume.

Include Semantically Related Keywords: Incorporate semantically related keywords throughout your content to provide context and relevance to search engines. This helps broaden the scope of your content and captures variations of search queries.

Create a User-Friendly Structure: Organize your content using clear headers, subheadings, and bullet points to enhance readability and navigation. A well-structured format not only improves user experience but also helps search engines understand the hierarchy and flow of your content.

Include Compelling Visuals: Enhance your content with high-quality images, infographics, and videos that are relevant to your topic. Visuals not only break up text and make content more engaging but also encourage social sharing and increase dwell time on your site.

Add Relevant Internal Links: Strategically link to other relevant pages or posts within your website to guide users to additional valuable content. Internal linking helps distribute link equity and improves the crawlability of your site.

Cover the Topic Comprehensively: Aim to provide comprehensive coverage of your topic, addressing common questions, concerns, and related subtopics. This not only satisfies user intent but also signals to search engines that your content is authoritative and thorough.

Include a Compelling Title, Meta Description, and Alt Text: Craft a catchy and descriptive title that includes your primary keyword. Write a compelling meta description that summarizes your content and encourages clicks in search engine results. Use descriptive alt text for images to improve accessibility and provide context to search engines.

Ensure Content is Accurate & Up to Date: Regularly review and update your content to ensure accuracy and relevance. Outdated information can negatively impact user trust and search engine rankings. Keeping your content fresh and relevant demonstrates authority and reliability in your niche.

By implementing these content optimization strategies, you can enhance the visibility, relevance, and engagement of your content, ultimately driving more organic traffic to your website and achieving long-term SEO success.

Content Optimization Tools

Content Optimization Tools

Keyword Research Tools

    • SEMrush
    • Ahrefs
    • Google Keyword Planner

On-Page Optimization Tools

    • Yoast SEO
    • Moz
    • Screaming Frog

Analytics and Monitoring Tools

    • Google Analytics
    • SEMrush
    • Ahrefs

Visual Content Creation Tools

    • Canva
    • Piktochart
    • Adobe Spark

Social Media Management Tools

    • Buffer
    • Hootsuite
    • Sprout Social

Email Marketing Tools

    • Mailchimp
    • Constant Contact
    • HubSpot Email Marketing

SEO Audit and Technical SEO Tools

    • Google Search Console
    • Screaming Frog
    • Moz Pro

Content Management Systems (CMS)

    • WordPress
    • Joomla
    • Drupal

These tools can assist in various aspects of content optimization, from keyword research and on-page SEO to analytics, visual content creation, and social media management, helping you maximize the impact and reach of your content.

Conclusion: Content Optimization

In conclusion, content optimization is a crucial way to get more people to your website and make it more visible.


You can significantly enhance the performance of your content by learning and using critical optimization hacks like doing thorough keyword research, writing catchy headlines, and creating high-quality content.


Visual features, suitable on-page SEO methods, and ensuring you follow technical SEO best practices will help your efforts even more.


You can also get your information out there more effectively by using social media, email marketing, and working with influencers.


You can improve your tactics and stay on top of SEO trends by constantly tracking and analyzing how well your content is doing.

By using these tried-and-true content improvement methods, you can get people to engage with your content in new ways and keep getting more visitors.


Start using these tactics immediately to see considerable gains in the success of your online marketing.

FAQs: Content Optimization

To optimize your website content:

  1. Conduct thorough keyword research.
  2. Write clear, relevant, and valuable content.
  3. Use compelling headlines and meta descriptions.
  4. Incorporate visual elements like images and videos.
  5. Ensure proper formatting with headers and bullet points.
  6. Implement internal linking.
  7. Optimize for mobile and page load speed.
  8. Continuously update and refine your content.

To find the best keywords for your content:

  1. Use keyword research tools like Google Keyword Planner, Ahrefs, or SEMrush.
  2. Focus on long-tail keywords with lower competition and higher relevance.
  3. Analyze competitor keywords.
  4. Consider search intent and user needs.

To improve your page load speed, use tools like:

  1. Google PageSpeed Insights
  2. GTmetrix
  3. Pingdom
  4. WebPageTest
  5. Lighthouse (built into Chrome DevTools)

To ensure your content is mobile-friendly:

  1. Use responsive web design.
  2. Test your site with Google’s Mobile-Friendly Test tool.
  3. Optimize images and videos for mobile.
  4. Simplify navigation and ensure buttons are easily clickable.
  5. Use larger font sizes and ample white space.

The best ways to distribute your content include:

  1. Sharing on social media platforms (Facebook, Twitter, LinkedIn).
  2. Email marketing campaigns to your subscriber list.
  3. Collaborating with influencers in your niche.
  4. Posting on content distribution networks and syndication sites.
  5. Engaging in relevant online communities and forums.

Unlock SEO Success Tips: Learn How to Perfect Your URL Structure

Let’s explore why URL structure in SEO matters, how it impacts your site’s performance, and the best practices to ensure your URLs are optimized for success.

To truly capture the essence of SEO success, it’s essential to comprehend a key yet often underestimated element: URL structure.

In the digital world, where competition is high, a well-optimized URL can significantly affect your search engine results and improve the user experience.

This guide explains why URL structure is vital for SEO and how it affects everything from PageRank to user happiness.

By learning how to create a simplified and SEO-friendly URL, you can make your site stand out for both users and search engines.

Read on to learn the most important tricks and tips for improving your URL layout and getting great SEO.

Table of Contents

Basics of URL Structure in SEO

Basics of URL Structure in SEO

Understanding the basics of URL structure is fundamental for optimizing your website for SEO.

Let’s break down the key elements:

What is a URL?

A URL (Uniform Resource Locator) is the address of a resource on the internet.

It directs web browsers to a specific location, enabling users to access webpages, images, videos, and other types of content.

Components of a URL

A URL is composed of several parts:

  1. Scheme: Indicates the protocol used, such as http or https.
  2. Domain: The main address, like example.com.
  3. Path: Specifies the exact location of a page or file within the website.
  4. Parameters: Used to pass data to the server, often seen in dynamic URLs.
  5. Anchor: Refers to a specific section within a webpage, indicated by a #.

Difference Between Absolute and Relative URLs

  • Absolute URLs include the entire web address, from the scheme to the path. For example, https://www.example.com/page1.
  • Relative URLs only include the path, relative to the domain. For example, /page1.

SEO-Friendly URLs: An Overview

Crafting SEO-friendly URLs is crucial for improving your site’s visibility and ranking.

Characteristics of SEO-Friendly URLs

  1. Short and Descriptive: Concise URLs are easier to read and share.

  2. Keywords: Including relevant keywords helps search engines understand the content.

  3. Hyphens: Use hyphens to separate words for better readability (example.com/seo-tips).

Common Mistakes to Avoid

  1. Long URLs: Avoid overly complex URLs.

  2. Underscores: Use hyphens instead of underscores.

  3. Special Characters: Avoid using characters like &, ?, % unnecessarily.

How to Change URL Structure in WordPress

Changing your URL structure in WordPress can enhance SEO:

  1. Go to Settings: Navigate to Settings > Permalinks.

  2. Select a Structure: Choose a predefined structure or create a custom one using tags.

  3. Save Changes: Ensure to update your settings and verify your URLs.

Does URL Structure Affect SEO?

Yes, URL structure significantly affects SEO. A well-optimized URL helps search engines understand your content, improves crawl efficiency, and enhances user experience.

Proper URL structure contributes to higher click-through rates and better ranking potential.

By mastering the basics of URL structure, you lay a strong foundation for SEO success, ensuring your website is both user-friendly and search engine optimized.

Why Does URL Structure Matter For SEO?

Understanding why URL structure matters for SEO is crucial for optimizing your website’s performance and user engagement.

1. User Experience

A well-crafted URL structure significantly enhances the user experience by providing clear, descriptive, and easily readable links.

When users can quickly understand the content of a page from its URL, they are more likely to click on it.

For instance, a URL like example.com/seo-tips is more informative and appealing than example.com/page1?id=123. Additionally, clean and concise URLs are more accessible to share on social media, boosting your website’s reach.

Proper URL structure also aids in site navigation, making it easier for users to find relevant information and reducing bounce rates, a positive signal to search engines.

2. PageRank

URL structure plays a pivotal role in PageRank, which is Google’s algorithm for ranking web pages in search results.

A well-structured URL can pass link equity more effectively, contributing to higher rankings.

Search engines prefer logical and keyword-rich URLs, as they provide clear signals about the page’s content.

Using relevant keywords in your URLs helps search engines index your pages correctly and boosts your visibility for those terms.

Moreover, a hierarchical URL structure reflects the organization of your content, allowing search engines to crawl and index your site more efficiently.

Avoiding complex and lengthy URLs ensures that all parts of your website receive the appropriate attention and rank better in search engine results.

Key Principles of Effective URL Structure

Key Principles of Effective URL Structure

Crafting an effective URL structure is essential for SEO success.

Here are the key principles to follow:

Keeping URLs Short and Descriptive

To enhance both user experience and search engine optimization, URLs should be kept short and descriptive.

Optimal URL Length

An optimal URL length is around 50-60 characters. Shorter URLs are easier to read, remember, and share, which can improve click-through rates and overall user engagement.

Importance of Relevance and Clarity

Each URL should clearly reflect the page’s content. A descriptive URL, such as example.com/seo-tips rather than example.com/page123, provides users and search engines with immediate context.

Using Hyphens to Separate Words

Using hyphens to separate words in URLs is a best practice.

Best Practices for Word Separation

Hyphens (-) are preferred over underscores (_) because search engines like Google treat hyphens as spaces between words, making the URL more readable and SEO-friendly.

Avoiding Underscores and Special Characters

Avoid using underscores and special characters like &, %, and ? in URLs, as they can complicate readability and search engine indexing.

Incorporating Keywords Naturally

Incorporating relevant keywords into URLs is vital for SEO, but it should be done naturally.

Keyword Placement in URLs

Place the most important keywords at the beginning of the URL to give them more weight.

For example, example.com/seo-strategies is better than example.com/strategies-for-seo.

Balancing SEO and Readability

While including keywords is essential, the URL must remain readable and logical. Avoid keyword stuffing, which can make URLs look spammy and negatively impact user experience and SEO.

By following these fundamental principles—keeping URLs short and descriptive, using hyphens for word separation, and incorporating keywords naturally—you can create effective URLs that enhance SEO performance and user experience.

Technical Aspects of URL Structure

Mastering the technical aspects of URL structure is crucial for ensuring your website is easily navigable, properly indexed by search engines, and optimized for SEO.

Understanding URL Hierarchy

A well-defined URL hierarchy helps in organizing content logically, making it easier for both users and search engines to navigate your site.

Organizing Content with URL Hierarchy

Organizing content using a clear and logical URL hierarchy involves structuring your URLs to reflect the site’s architecture.

For instance, a blog post about SEO tips could have a URL like example.com/blog/seo-tips, where blog is the main category, and seo-tips is the specific post.

Benefits for Crawling and Indexing

A structured URL hierarchy aids search engines in crawling and indexing your site more efficiently.

It allows search engines to understand the relationship between different pages, ensuring that your content is comprehensively indexed and accurately represented in search results.

Choosing the Right Domain Name

Selecting the right domain name is a foundational aspect of your URL structure and can significantly impact your SEO efforts.

Impact of Domain Names on SEO

A short, memorable domain name with relevant keywords can enhance your site’s SEO.

It helps establish relevance and authority in your niche, contributing to higher search engine rankings.

Tips for Selecting an SEO-Friendly Domain

When choosing a domain name, opt for something concise, easy to spell, and preferably with a .com extension.

Including a primary keyword can be beneficial, but avoid overstuffing keywords as it can appear spammy.

Using Subdomains vs. Subdirectories

Deciding between subdomains and subdirectories can influence your site’s SEO and how search engines perceive content.

Pros and Cons of Subdomains

Search engines treat subdomains (e.g., blog.example.com) as separate entities. This can be beneficial for organizing distinct sections of your site but may dilute your SEO efforts if not managed properly.

When to Use Subdirectories

Subdirectories (e.g., example.com/blog) are generally preferred for SEO as they consolidate authority under a single domain.

Use subdirectories to maintain a unified domain structure and strengthen the overall SEO value of your leading site.

By understanding and implementing these technical aspects of URL structure, you can create a well-organized, SEO-friendly website that is easy for search engines to crawl and index, ultimately boosting your visibility and user experience.

Advanced URL Structure Techniques

Delving into advanced URL structure techniques is essential for fine-tuning your SEO strategy and ensuring your website performs optimally.

Canonicalization and Duplicate Content

What is a Canonical URL?

A canonical URL is a tag that tells search engines which version of a URL should be considered the “main” one when there are multiple URLs with similar or identical content.

This helps prevent issues with duplicate content, which can harm your SEO by splitting link equity between different versions of the same page.

Implementing Canonical Tags Correctly

To implement canonical tags correctly, add a <link rel= “canonical” href= “URL”> tag in the <head> section of your HTML.

Ensure the canonical URL points to the preferred version of the page, whether it’s the primary URL or another variant that consolidates the SEO value.

This informs search engines which URL to index and rank, thereby improving your site’s SEO.

URL Parameters and Their Impact on SEO

Handling URL Parameters Effectively

URL parameters, such as those used for tracking or sorting content, can create multiple versions of a page, leading to duplicate content issues.

To handle URL parameters effectively, use Google Search Console to specify how parameters should be treated, and consider using canonical tags to indicate the primary version of the page.

Best Practices for Parameter Management

When managing URL parameters, keep them to a minimum and use them only when necessary.

Avoid using parameters for content that can be displayed without them. Additionally, ensure that parameter order does not change the meaning of the URL, and use descriptive names for parameters to maintain clarity.

Implementing 301 Redirects

When and How to Use 301 Redirects

301 redirects are used to permanently redirect one URL to another, preserving the SEO value of the original page.

Use 301 redirects when you change a page’s URL, consolidate content, or delete pages.

This ensures that users and search engines are directed to the correct page without losing the ranking power of the original URL.

Avoiding Redirect Chains

Redirect chains, where one URL redirects to another and then to another, can slow down your site and dilute SEO value.

Always point redirects directly to the final destination URL to avoid redirect chains.

Regularly audit your site for unnecessary redirects and update them to reduce chains.

URL Structure for Different Types of Content

Optimizing your URL structure according to the type of content on your website is crucial for enhancing SEO and improving user experience.

Optimizing URLs for Blogs and Articles

Structuring Blog URLs

For blogs, URLs should be concise and reflect the post’s content. A typical structure might be example.com/blog/post-title.

This makes the URL easy to read and provides search engines with clear information about the page’s content.

Tips for Article URLs

When crafting URLs for articles, include primary keywords relevant to the content. Avoid using unnecessary words and stop words like “and,” “or,” and “the.”

For instance, example.com/blog/seo-tips is more effective than example.com/blog/some-useful-seo-tips-for-beginners.

E-commerce URL Best Practices

Product Page URLs

Product page URLs should be straightforward and include the product name. This helps users and search engines understand what the page is about.

For example, example.com/products/product-name is ideal. Avoid using long strings of numbers or irrelevant information.

Category and Filter URLs

For category pages, URLs should reflect the category name, such as example.com/category-name.

When dealing with filters, ensure that the URLs remain clean and readable.

Use URL parameters wisely to avoid creating duplicate content issues, and consider canonical tags to guide search engines to the preferred URL.

Handling URLs for Multimedia Content

Video and Image URLs

URLs for multimedia content like videos and images should include relevant keywords that describe the content.

For example, example.com/videos/seo-tutorial or example.com/images/seo-diagram. This not only helps in SEO but also makes the URLs more user-friendly.

Optimizing URLs for PDFs and Other Files

When linking to PDFs or other downloadable files, use descriptive filenames and include keywords in the URL.

For example, example.com/resources/seo-guide.pdf is preferable to example.com/resources/document123.pdf.

This practice helps search engines index these files properly and improves their discoverability.

What Are The Best Practices For a URL Structure in SEO?

Best Practices For a URL Structure in SEO

Implementing best practices for URL structure is essential for enhancing your website’s SEO performance and user experience.

Here are 12 key practices to follow:

1. Follow a Good URL Structure

Ensure your URL structure is logical and hierarchical. This makes it easier for users and search engines to navigate your site.

For example, a structure like example.com/category/subcategory/page is clear and organized.

2. Use HTTPS Protocol

Always use HTTPS instead of HTTP. HTTPS encrypts data for security and is favored by search engines, providing a ranking boost.

3. Hide the www Prefix

Hiding the www prefix simplifies your URLs. Users prefer shorter URLs, and it creates a cleaner appearance.

Redirect www.example.com to example.com to maintain consistency.

4. Edit the Page URL to Be Relevant

Customize each page’s URL to reflect its content. Avoid auto-generated URLs with random strings of numbers and letters.

Instead, use descriptive words that indicate the page’s topic.

5. Keep It Short and Simple

Shorter URLs are easier to read, type, and share. Aim for URLs under 60 characters while ensuring they remain descriptive and clear.

6. Use Meaningful Keywords

Incorporate primary keywords into your URLs. This enhances SEO by providing clear context about the page’s content to search engines and users.

7. Use Hyphens to Separate Words

Use hyphens (-) to separate words in URLs. Hyphens improve readability and are preferred by search engines over underscores (_).

8. Eliminate Stop Words

Remove common stop words like “and,” “or,” “the,” and “of” from your URLs to keep them concise and focused on relevant keywords.

9. Use Lowercase Letters

Stick to lowercase letters in URLs. Mixed or uppercase letters can cause duplicate content issues if different URLs point to the same content.

10. Redirect Old URLs

If you change a URL, use 301 redirects to direct traffic from the old URL to the new one. This preserves link equity and avoids 404 errors, which can harm SEO.

11. Remove Dates from Blog Posts

Exclude dates from blog post URLs to keep them evergreen. This makes your content appear timeless and prevents URLs from becoming outdated quickly.

12. Spell Out Numbers (Sometimes)

Use words instead of digits for numbers in URLs, especially for small numbers. For example, example.com/top-ten-tips is preferable to example.com/top-10-tips.

By following these 12 best practices, you can create an optimized URL structure that improves your site’s SEO, enhances user experience, and ensures better indexing by search engines.

Measuring and Analyzing URL Performance

To achieve and maintain an optimized URL structure, it’s crucial to measure and analyze URL performance regularly.

This ensures that your URLs are functioning effectively and contributing positively to your SEO strategy.

Using Analytics to Track URL Performance

Key Metrics to Monitor

When tracking URL performance, monitor metrics such as click-through rate (CTR), bounce rate, and organic traffic.

CTR indicates how often users click on your URL in search results, while bounce rate shows the percentage of visitors who leave after viewing only one page.

Organic traffic measures the number of visitors arriving at your site through search engines, reflecting the effectiveness of your URLs in attracting search traffic.

Tools for URL Analysis Several

tools can help analyze URL performance. Google Analytics provides comprehensive insights into user behavior, traffic sources, and conversion rates.

Google Search Console is invaluable for monitoring how Google indexes your site, highlighting issues like crawl errors and providing data on search queries and impressions.

Other tools like Screaming Frog SEO Spider and Ahrefs can offer in-depth analysis and tracking of URL performance.

Conducting URL Audits

Steps for a Comprehensive URL Audit

To conduct a thorough URL audit, follow these steps:

  1. Crawl Your Site: Use tools like Screaming Frog to crawl your site and identify all existing URLs.

  2. Analyze URL Structure: Check for issues such as overly long URLs, improper use of parameters, and inconsistent formats.

  3. Check for Duplicate Content: Identify and address duplicate content issues, using canonical tags where necessary.

  4. Review Redirects: Ensure all redirects are properly implemented and avoid redirect chains.

Identifying and Fixing Issues

Once you identify issues through the audit, take steps to fix them. For overly long URLs, shorten them while maintaining relevance.

Correct improperly used parameters and ensure consistent URL formats.

Address duplicate content by implementing canonical tags or 301 redirects as needed.

Regularly update and maintain your URL structure to adapt to new content and changes in SEO best practices.

Future Trends in URL Structure

As technology evolves, the landscape of URL structure is poised to undergo significant changes.

Understanding emerging trends and leveraging new technologies will be crucial for optimizing URL structures in the future.

Emerging Trends and Technologies

Impact of Voice Search on URL Structure

With the rise of voice search technologies like Siri, Alexa, and Google Assistant, the way users interact with search engines is shifting.

Voice searches tend to be more conversational and longer than typed queries.

This trend is likely to influence URL structure by favoring URLs that are natural language-friendly and optimized for spoken queries.

Websites may need to adapt by creating URLs that reflect common voice search phrases and questions.

The Role of AI in URL Optimization

Artificial Intelligence (AI) is revolutionizing various aspects of SEO, including URL optimization. AI algorithms can analyze vast amounts of data to predict user behavior and optimize content accordingly.

In URL structure, AI can assist in generating URLs that are not only SEO-friendly but also tailored to user preferences and search engine algorithms.

AI-powered tools can suggest optimal URL formats, keywords, and content strategies based on real-time data trends and user behavior patterns.

Conclusion: Best Practices and Final Tips for URL Success

A key part of any good SEO plan is learning how to structure URLs correctly.

Optimizing your website’s URLs can improve both search engine visibility and user experience by following best practices and understanding key concepts.

First, make sure that your URLs are structured in a way that makes sense and is easy to understand.

Use the HTTPS protocol to make links safer and more trustworthy, and make sure the www prefix is removed or hidden to make URLs look better.

Change the URLs of pages so that they are more relevant and clear by adding important keywords and hyphens between words.

Remember to keep URLs short and easy. Don’t use extra stop words, and always use lowercase letters.

To keep your link value, redirect old URLs, and to keep content that is evergreen, remove dates from blog posts. When it makes things easier to read and understand, you might want to spell out numbers.

Your URLs will stay optimized as long as you keep an eye on them with tools like Google Analytics and do regular checks.

Check important measures like click-through rate (CTR) and bounce rate to see how well your site is doing, and use what you learn to find and fix problems quickly.

In the future, you should get ready for things like how voice search will change URL layout and how AI will play a part in optimization.

It would help if you changed your plans to account for these improvements so that your URLs stay useful and competitive in the ever-changing digital world.

By following these best practices and keeping up with new trends, you can make your URL layout better and achieve SEO success.

Add URLs to your website that will not only bring people there, but also make them more engaged and happy, which will help you reach your general SEO goals.

FAQs: URL Structure in SEO

Common URL mistakes include:

  • Using long and complex URLs.
  • Not including keywords.
  • Using underscores instead of hyphens.
  • Not redirecting old URLs properly.

You can improve existing URLs by making them shorter, adding relevant keywords, using hyphens to separate words, and implementing 301 redirects if URLs are changed.

A URL is structured with a protocol (e.g., https://), domain name (e.g., example.com), path (e.g., /blog/post-title), and optional parameters (e.g., ?utm_source=google).

The four parts of a URL are:

  • Protocol (e.g., https://)
  • Domain name (e.g., example.com)
  • Path (e.g., /blog/post-title)
  • Parameters (e.g., ?utm_source=google)

"www" in a URL is called a subdomain prefix, typically used to indicate the World Wide Web.

URL size refers to the length of a URL string in characters. It's recommended to keep URLs concise, ideally under 60 characters, to ensure they are user-friendly and SEO-friendly.

Write a URL by starting with the protocol (e.g., https://), followed by the domain name, then the path to the specific page or resource, and optional parameters if needed. Use hyphens to separate words and ensure URLs are descriptive and relevant to the content they represent.

Mastering Canonicalization in SEO: Step-by-Step Fixes for SEO Success

Mastering Canonicalization in SEO is vital to getting the best search engine success in the ever-changing world of SEO.

Canonicalization is crucial for ensuring your website has no harmful duplicate content, which can significantly affect your rankings and exposure.

Google Webmaster Trends Analyst Gary Illyes says that about 60% of the internet is made up of duplicate content.

Gary Illyes, ~60 of the internet is duplicate content

It’s something that people often forget about.

Using canonical tags to tell search engines which version of a URL should be taken as the official source is essential to Canonicalization.

This speeds up the crawling and indexing process and prevents link ownership from being spread out among many similar pages.

This detailed guide will cover the basics of Canonicalization, discuss common mistakes, and give you step-by-step solutions to help you get the most out of your SEO plan.

Let’s start this trip by uncovering the mysteries of canonical tags and learning how to achieve SEO success.

Understanding Duplicate Content Issues

Problems with duplicate content can really hurt your website’s SEO, so it’s important to know the different kinds and how they affect things.

Duplicate content is when blocks of information on different URLs are the same or very similar.

Internal and external copies are the two main types.

Internal duplicates happen within the same site. This is usually because of technical issues like session IDs, versions that are easy to print, or different URL parameters.

External duplicates, on the other hand, are pieces of content that are copied or syndicated across different domains. For example, news releases or guest blog posts that are posted on more than one website.

Duplicate information has a big effect on how well SEO works. Search engines like Google try to give people the most relevant and original content.

This makes it hard for them to tell which version of the content is the official source when they find duplicate content.

Several bad things can happen as a result: link equity is lost because backlinks are spread across multiple URLs; crawl efficiency goes down because search engines waste time and resources indexing duplicate pages instead of new content; and there is a chance of ranking penalties if none of the duplicate pages rank well because they have the same content.

In the worst cases, duplicate content can make search engines take action on your site by hand, which can lower your exposure and traffic.

So, dealing with and fixing problems with duplicate content is important for keeping an SEO plan that works well.

Fundamentals of Canonicalization in SEO

Fundamentals of Canonicalization in SEO

The basics of Canonicalization are important for keeping your website’s structure clear and authoritative, without any problems caused by duplicate content.

In this process, the canonical tag is very important. It is an HTML element that tells search engines which version of a URL you want to be seen as the official one.

This is what the canonical tag looks like in the part of a webpage: <link rel=”canonical” href=”https://www.example.com/preferred-url” />.

By telling search engines the preferred URL, you tell them that this is the main version of the content.

This tells them to combine ranking signals and not index multiple copies of the same content.

Search engines use canonical tags as instructions to figure out where the content came from in the first place.

When a search engine bot visits your site and finds a canonical tag, it knows that the URL given should be used as the official version.

This means that any link equity, or ranking power, that was spread out among multiple pages is now directed to the canonical URL, which makes it more visible in search results.

Additionally, canonical tags help avoid the confusion and waste that comes from indexing multiple pages that are very similar.

This makes the crawl process more efficient and makes sure that search engines focus their resources on indexing unique and useful content.

By using canonical tags properly, you can keep your site’s architecture clean, increase its search engine ranking, and avoid penalties associated with duplicate content.

Common Canonicalization Mistakes

Common canonicalization mistakes can hurt your SEO efforts if you don’t fix them properly. They can cause search engines to get confused, which could hurt your site’s results.

A common mistake is not having any canonical tags at all. Search engines may treat each version of a page with duplicate content as a different entity if it doesn’t have canonical tags.

This makes the pages compete for rankings. This makes your material less trustworthy, which can make it less visible overall.

Another big mistake is using canonical tags in the wrong way. This can happen if the canonical URL given is not the preferred form of the content or if the tag is put in the HTML code in the wrong place.

For example, using a canonical tag that goes to a URL that doesn’t exist or isn’t relevant, or putting it on pages with very different content, can confuse search engines and cause problems with indexing.

Dynamic URL parameters that make multiple copies of the same content without the right canonicalization directives can also lead to incorrect Canonicalization.

This makes search engine indexing even more difficult and could lead to duplicate content fines.

To avoid these common canonicalization mistakes, you need to pay close attention to every detail and fully understand how canonical tags work.

By making sure that every page with duplicate content has a canonical tag that points to the chosen URL, you can improve crawl efficiency, combine ranking signals, and protect your site’s SEO from mistakes that could hurt it.

Step-by-Step Canonicalization Fixes

Step by Step Canonicalization

To master Canonicalization, you need to make a number of organized changes to your website’s SEO strategy so that it works best and is clear.


Here are the step-by-step canonicalization fixes explained for more clarity:

Audit Your Website for Duplicate Content:

    • Use SEO tools to crawl your website and identify pages with identical or very similar content.

    • Compile a list of URLs that need attention for Canonicalization.

Identifying Pages for Canonicalization:

    • Assess the relevance and authority of each duplicate page.

    • Select a preferred URL that represents the content best and is most likely to rank well.

Implementing Canonical Tags Correctly:

    • Insert the <link rel=”canonical” href=”preferred-url” /> tag in the <head> section of each duplicate page.

    • Ensure the canonical tag points to the chosen preferred URL accurately.

    • Verify that the canonical URL is valid and leads to the correct content.

Handling Complex URL Structures:

    • Address dynamic URLs generated by parameters like sorting options or session IDs.

    • Consider using URL parameters dynamically in canonical tags or implementing URL rewriting techniques.

    • Aim to create clean and consistent URLs across your website to avoid duplicate content issues.

These steps will help you effectively manage Canonicalization on your website, improve SEO performance, and ensure search engines correctly index and rank your preferred content versions.

Best Practices for Canonicalization

Adhering to best practices ensures your website maintains clarity and authority in search engine rankings when mastering Canonicalization for optimal SEO success.

Consistency is paramount in Canonicalization, where each page with duplicate content should consistently reference the same preferred canonical URL.

This uniformity prevents confusion for search engines and reinforces the authority of your chosen content version.

Canonicalizing pagination and sorting pages is crucial for sites with extensive content displayed across multiple pages or with various sorting options.

By implementing canonical tags on paginated or sorted pages, you consolidate ranking signals to a single preferred URL, enhancing the overall SEO value of your content and avoiding penalties for duplicate content.

Handling mobile and desktop versions involves ensuring that both versions of your site utilize canonical tags appropriately, whether accessed from mobile devices or desktop computers.

This practice ensures that search engines understand the primary version, preventing duplicate content issues arising from different URL structures or content variations between mobile and desktop versions.

By implementing these best practices—maintaining consistency in Canonicalization, canonicalizing pagination and sorting pages, and handling mobile and desktop versions effectively—you can strengthen your site’s SEO foundation, improve crawl efficiency, and maximize the visibility and ranking potential of your content across various platforms and user devices.

Advanced Techniques for Canonicalization

Advanced Techniques for Canonicalization

To understand Canonicalization in advanced SEO strategies, you need to use techniques that are designed to deal with problems like cross-domain issues, parameterized URLs, and international SEO needs.

Cross-domain Canonicalization is used when content that is the same or similar appears on more than one domain.

By using canonical tags that point to the chosen URL across all domains, you combine ranking signals and avoid problems with duplicate content.

This lets search engines know which domain is the main source of content authority.

When you use parameterized URLs for Canonicalization, you can deal with the problem of dynamic content changes caused by URL factors like sorting options or session IDs.

Using canonical tags that change based on parameter values helps to combine ranking signs into a single canonical URL.

This makes crawling faster and stops duplicate content variations from being indexed.

Canonicalization is a very important part of foreign SEO because it helps you deal with duplicate content on different language or regional versions of your site.

When you use canonical tags along with hreflang tags, you tell search engines which version of the content is meant for different languages or countries.

This ensures that people looking in different languages or areas get to the most relevant and trustworthy content, improving the user experience and SEO performance worldwide.

You can improve your website’s structure, make it more visible to search engines, and keep content authoritative across different online environments by using these advanced canonicalization methods: cross-domain Canonicalization, Canonicalization with parameterized URLs, and Canonicalization for international SEO.

Monitoring and Maintaining Canonical Tags

For your SEO efforts to continue to work and for your website to stay optimized for search engine exposure, you need to keep an eye on and update the canonical tags.

The first step in this process is to do regular site checks. This will let you review and update canonical tags as your site changes.

During these checks, use SEO tools to crawl your website and find any problems or discrepancies with Canonicalization, like tags that are missing or not being used correctly.

When you use tracking tools, you can always see how the canonical tags on your site are doing. Use SEO tracking tools that have features just for analyzing and keeping an eye on canonical tags.

These tools can help you keep track of changes, find new duplicate content, and make sure that all canonical tags always point to the right recommended URLs.

By checking the canonical tags on a regular basis, you can quickly fix any problems that come up, keep your site’s structure clean, and stick to your SEO plan to get the best results from search engines and improve the user experience.

Future Trends in Canonicalization

As time goes on, technology advances and search engine algorithms change, which means that Canonicalization in SEO will likely change in big ways.

Machine learning is going to be very important for making the canonicalization process better.

As machine learning models help search engines like Google improve their algorithms, they will be able to better understand and favor canonical tags.

Machine learning algorithms can look at huge amounts of data to find patterns in duplicate content and make canonicalization choices more accurate.

This makes search engines work better and give users more relevant results.

Canonicalization will change in the future as strategies for dynamic material change.

More and more websites have material that changes based on how users interact with them, like personalized suggestions or updates in real time.

Canonicalization strategies will have to change in order to handle and prioritize these changing pieces of material effectively.

It will be necessary to use dynamic canonical tags that change based on user actions or changes to the content to make sure that search engines correctly scan and rank the most relevant versions of the content.

This will protect SEO integrity and keep users interested.

As SEO changes, it will be important to keep up with these future canonicalization trends, such as using machine learning to improve accuracy and adapting strategies for dynamic content, to stay ahead of the competition and improve search engine visibility in a world that is getting more complicated.

Adding these new developments to your SEO plan will help your website be ready for the future and make it better at sending relevant, trustworthy content to users all over the world.

Conclusion: Mastering Canonicalization in SEO

To sum up, learning Canonicalization is not only a technical SEO strategy, it’s also a must if you want to keep your online presence strong.

Understanding duplicate content problems and fixing them through effective Canonicalization in SEO can improve your website’s credibility and visibility in search engine results.

The main things you should remember from this detailed guide are how important it is to use canonical tags correctly to combine ranking signals, how important it is to do regular site audits to make sure everything is correct, and how to use advanced techniques like cross-domain Canonicalization and handling dynamic content in a smart way.

As machine learning and dynamic content strategies change SEO, it will be important to stay on top of canonicalization practices to keep up with new trends and stay ahead of the competition.

By mastering Canonicalization, you set yourself up for long-term SEO success and a better user experience. This makes sure that your content gets the right people across all digital platforms.

FAQs: Canonicalization in SEO

Canonical tags consolidate ranking signals to a preferred URL, preventing duplicate content issues. This helps focus SEO efforts on one authoritative page, improving its potential to rank higher in search results.

Yes, canonical tags can be used across different domains to specify the preferred URL for content that appears on multiple sites. This helps consolidate authority and prevent duplicate content penalties.

Incorrect Canonicalization can lead to search engines misinterpreting the intended primary content, potentially causing duplicate content issues, loss of ranking authority, and SEO penalties. It's crucial to implement canonical tags accurately to avoid these risks.

Maximizing SEO Potential: The Definitive Guide to Harnessing Meta Tags for Enhanced Website Visibility

Knowing the different roles of meta tags for SEO in digital marketing is like finding a secret treasure chest full of website visibility gold. 


Meta tags tell search engines essential things about the text of a webpage without being heard. 


Today, having an online presence is very important, so learning how to use meta tags is very important if you want your website to stand out in the sea of online content that is constantly growing. 


This complete guide will explain everything about meta tags, from writing catchy meta titles to making meta descriptions work better and using dynamic tags for e-commerce platforms. 


It will also show you how to use these tags to get the most out of your SEO. 


Join us on this trip as we explore the world of meta tags and look at how they can make your website more visible than ever before.

meta tags for seo

A key part of SEO strategy is using meta tags, which are HTML elements that tell search engines important things about a webpage’s text. 


Meta tags are very important for how search engines analyze and show a site’s content in search results, even though you might not be able to see them on the page itself. 


Meta tags basically allow website owners to communicate directly with search engine bots, providing information about the type of content they have and its relevance. 


Meta tags help authors make their pages more visible in search engines by telling search engines about keywords, content types, meta titles, and descriptions. 


Understanding what meta tags are for and how they can be used is an important part of any SEO plan, as they are the key to making a website more visible and getting more organic traffic.

Types of Meta Tags

Title Tags: One of the most important meta tags for SEO is the title tag, which is also called a meta title. 


They show up as clickable headlines in search engine results pages (SERPs) and give a short summary of what the page is about. 


Title tags that are well-written not only get people to click through to the website, but they also tell search engines important things about the page’s content, which helps it rank higher for related queries. 


Meta Descriptions: These are short summaries of the page’s material that show up below the title tag in SERPs. Even though meta descriptions aren’t directly related to ranking, they can have a big effect on click-through rates (CTR) by making people want to visit the site. 


Good meta descriptions use relevant terms and give a tantalizing sneak peek at the content, which makes people want to read more on the page. 


Meta Keywords: Meta keywords used to be an important part of SEO, but they’ve lost some of their importance over time because they’ve been abused and manipulated. 


Still, some search engines still use meta terms to figure out how relevant a page is, though not as much as they used to. 


Even though they might not have a big effect, using important meta keywords can still help with an overall SEO plan. 


Other Important Meta Tags: Title tags, meta descriptions, and meta keywords aren’t the only meta tags that are important for making a website more visible. 


Meta robots tags tell search engine crawlers how to read and follow links on the page, and meta viewport tags make sure that the page renders and scales correctly on mobile devices. 


Open Graph meta tags are very important for social media optimization because they let websites decide how their material looks when it’s shared on Facebook, Twitter, and other sites. 


Structured data markup, which is done through schema.org, gives search engines more information about the content, which makes it more visible in knowledge graph and rich snippets results. 


To get the most out of SEO and improve website exposure, you need to understand and use these different meta tags correctly.

Crafting Effective Meta Titles

Best Practices for Title Tags:

When crafting title tags, it’s essential to keep them concise yet descriptive, typically between 50-60 characters to ensure they display properly in search results. 


Begin with the primary keyword or key phrase relevant to the page’s content, ideally placed at the beginning of the title. Incorporate compelling language that grabs attention and entices users to click through to your website. 


Avoid stuffing title tags with keywords or making them overly generic; instead, aim for specificity and relevance to improve both user engagement and search engine visibility.


Optimizing Title Tags for SEO:

Optimizing title tags for SEO involves strategic placement of keywords while maintaining readability and relevance. Conduct keyword research to identify high-value terms related to your content, and incorporate them naturally into your title tags. 


Aim to strike a balance between including keywords and crafting titles that resonate with your target audience. Additionally, consider localizing title tags for location-specific content to enhance visibility in local search results. 


Regularly monitor and analyze the performance of your title tags using tools like Google Search Console to refine and optimize your approach over time.


Examples of Compelling Title Tags:

1. “Unlocking the Secrets of SEO: A Comprehensive Guide | YourWebsite.com”

2. “10 Proven Strategies for Boosting Website Traffic | YourWebsite.com”

3. “Delicious and Nutritious Recipes for Busy Weeknights | YourFoodBlog.com”

4. “The Ultimate Guide to DIY Home Improvement Projects | YourHomeRenovation.com”

5. “Stay Ahead of the Curve: Latest Trends in Digital Marketing | YourMarketingAgency.com”


These examples showcase the integration of relevant keywords, compelling language, and clear value propositions to create title tags that not only enhance SEO but also attract clicks and drive traffic to your website.

Enhancing Meta Descriptions

Significance of Meta Descriptions

Meta descriptions are short snippets of a webpage’s content that give users an idea of what to expect when they click through from search engine results pages (SERPs) to the site. 


Meta descriptions don’t directly affect rankings, but they have a big impact on how engaged users are and how many times they click through.


A well-written meta description can get people to visit a website by giving them an interesting sneak peek at the content, which increases traffic and exposure overall. 


Tips for Writing Engaging Meta Descriptions

When writing meta descriptions, aim to sum up the main idea of the page’s material in 150 to 160 characters. 


To get people to do something, like read a story, buy something, or sign up for a service, use language that makes them want to act. 


Use natural keywords that are relevant to the meta description to let both users and search engines know that it is important. 


To make your page stand out from others and get people’s attention, you might want to stress your page’s unique selling points or benefits. 


Also, make sure that the meta description matches the page’s content exactly to keep users’ trust and trustworthiness. 


Impact of Meta Descriptions on Click-Through Rates (CTR)

Meta descriptions have a direct effect on click-through rates because they give people information that makes them more or less likely to click on a search result. 


CTRs can go up a lot if the meta descriptions are interesting and clearly explain what the page is about. This brings more organic traffic to the website. 


On the other hand, meta descriptions that are too general or poorly written may not interest the user, which can lead to lower CTRs and missed chances to connect. 


Website owners can improve their general visibility in search results and get the most out of SEO by making sure their meta descriptions are informative, interesting, and relevant.

Technical Aspects of Meta Tags

Leveraging Open Graph Meta Tags for SEO

HTML Structure of Meta Tags

Meta tags are HTML parts that give information about a webpage. They are in the part of an HTML file and have two attributes: a name attribute and a content attribute. 


The name attribute tells what kind of metadata it is, like “description” for meta descriptions or “keywords” for meta keywords. The content attribute, on the other hand, holds the metadata’s real content. 


Some meta tags may also have other properties, such as charset to set the character encoding or viewport to change how the viewport looks on mobile devices. 


Implementing Meta Tags in Various CMS Platforms

Using meta tags in different content management system (CMS) platforms can be different based on what those platforms can do and how they can be set up. 


Most current content management systems (CMS) have built-in tools or add-ons that can help you manage meta tags. Using SEO tools like Yoast SEO or All in One SEO Pack, users can easily change the meta titles and descriptions for each page or post on platforms like WordPress. 


In the same way, systems like Shopify and Magento let you change or add plugins to meta tags on e-commerce sites. 


To make sure your site is properly optimized for search engines, you need to learn how to use meta tags in the way that works best for your chosen CMS platform. 


Common Mistakes to Avoid in Meta Tag Implementation

When using meta tags, there are a few common mistakes that can make them less useful and less effective for SEO. Some of these are: 


– Meta tags that are used more than once: Each page should have its own meta tags that are specific to its content. Do not use the same meta names or descriptions on more than one page. 


– Meta tags that are missing or not complete: Make sure that meta tags like meta titles and descriptions are present and correctly describe the page’s content. Not having enough or missing meta tags can make your site less visible in search engines. 


Using too many keywords: Even though it’s important to use useful keywords in meta tags, search engines may see pages that have too many keywords as spam. When you use keywords, make sure you use natural English and make it easy to read. 


– Not taking technology issues into account: Character encoding, viewport settings for mobile optimization, and organized data markup for better search engine understanding are all technical things that you should pay attention to.


 If you don’t pay attention to these technical points, it could cause problems with crawling and showing up in search results. 


Website owners can get the most out of meta tags to improve SEO and make their sites more visible by knowing how they are structured in HTML, using them correctly in different CMS platforms, and not making common mistakes.

Leveraging Open Graph Meta Tags for SEO

Introduction to Open Graph Protocol

Open Graph meta tags are a type of meta tags that were made just for social media sites. 


Facebook made them available as part of the Open Graph Protocol. Website owners can change how their material looks when it’s shared on social networks like Facebook, Twitter, LinkedIn, and more with these meta tags. 


The Open Graph Protocol describes a group of structured information properties that can be added to web pages. These properties help social media sites better understand and show content. 


This is how Open Graph meta tags are structured in HTML. They have features like “og:title” for the content’s title, “og:description” for its description, “og:image” for its thumbnail or featured image, and more. 


Benefits of Open Graph Meta Tags for Social Sharing

Open Graph meta tags have many benefits for social sharing, making shared material more visible and encouraging people to interact with it on social media sites. 


Open Graph tags give websites structured metadata that lets them control how their content shows up in social media feeds, making sure it looks good and is presented correctly. 


This can lead to higher click-through rates (CTR) and engagement, since users are more likely to interact with material that looks good and tells them something. 


Open Graph tags also let website owners change the titles, descriptions, and images of the content shared on social media to get more users to interact with their content and make their business more visible. 


Implementing Open Graph Tags for Better Visibility on Social Media

Using Open Graph Tags to Get More Attention on Social Media 

Using Open Graph meta tags is pretty easy. 


All you have to do is add some HTML tags to the part of web pages. Website owners can add these tags to each page by hand, or they can use tools or extensions for popular content management systems (CMS) like Joomla, WordPress, or Drupal. 


It’s important to make sure that the metadata for Open Graph tags correctly describes the page’s content and is set up for social sharing. 


This means using catchy titles and descriptions, high-quality images, and useful content that makes people want to click through and interact with it. 


Website owners can get the most out of their SEO by using Open Graph meta tags correctly to boost their sites’ visibility and activity on social media sites.

Schema Markup and Meta Tags

Understanding Schema Markup

It helps search engines better understand what’s on web pages. It gives more information about the information on a site by using a standard set of tags, or schema. 


This structured data helps search engines organize and show information in more detailed ways, like knowledge panels, rich snippets, and other improved search results. 


Schema.org is a project that major search engines like Google, Bing, Yahoo, and Yandex have worked together on. It has a large schema vocabulary that includes words for articles, goods, events, organizations, and more. 


Integrating Schema Markup with Meta Tags

Schema markup and meta tags are used for different things, but they can work together to make your site easier for search engines to understand and find. 


Website owners can give search engines even more information about their content by combining style markup with meta tags. 


Schema markup features can be added to meta tags like meta titles and descriptions to show the type of content, who wrote it, when it was published, and other information that is useful. 


Search engines can better understand and show material in search results when structured data and meta tags are used together. This increases click-through rates and user engagement. 


Enhancing Search Engine Understanding with Structured Data

Schema markup and meta tags make structured data possible, which is a key part of building search engines’ understanding of web material. 


Structured data helps search engines give users more useful and relevant search results by giving more information about the information on a webpage, like metadata and extra information about the page’s content. 


Structured data powers rich snippets, which show users a sample of the content right in the search results. This makes the content more visible and increases the number of clicks. 


Structured data also lets search engines show content in specific search features, such as information panels, local business listings, and event schedules. 


This improves the user experience and brings more people to websites naturally. So, using schema code with meta tags is necessary to get the most out of SEO and make sure that your website shows up higher in search engine results.

Free Tools to Add and Check Your Meta Tags

Ensuring that your meta tags are properly crafted and optimized is essential for maximizing SEO potential and enhancing website visibility. 


Fortunately, several free tools are available to help you add and check your meta tags effectively.


1. Google Search Console: Google Search Console is a powerful tool provided by Google that allows website owners to monitor and optimize their site’s presence in Google Search results. 


Within the Search Console, you can access the “HTML Improvements” report to identify any issues with your meta tags, such as missing or duplicate titles and descriptions. 


Additionally, the “URL Inspection” tool enables you to check how Google crawls and indexes individual pages, including their meta tags.


2. Yoast SEO: Yoast SEO is a popular WordPress plugin that offers a range of features to optimize your website for search engines. With Yoast SEO, you can easily edit and optimize meta titles and descriptions for each page or post on your WordPress site. 


The plugin also provides real-time feedback and suggestions to improve your meta tags based on SEO best practices.


3. MozBar: MozBar is a browser extension offered by Moz that provides valuable SEO insights as you browse the web. 


With MozBar, you can quickly analyze the meta tags of any webpage, including title tags, meta descriptions, and meta keywords. 


This tool also offers additional metrics like domain authority and page authority to help you evaluate the overall SEO performance of a site.


4. SERPsim: SERPsim is a simple yet effective online tool for previewing how your meta tags will appear in search engine results pages (SERPs). 


With SERPsim, you can enter your meta title, description, and URL to generate a preview of how they will look on Google. This allows you to optimize your meta tags for maximum visibility and click-through rates.


5. SEOptimer: SEOptimer is a comprehensive SEO audit tool that includes a meta tag analyzer feature. Simply enter your website URL, and SEOptimer will scan your site for various SEO factors, including meta tags.


The tool provides detailed reports highlighting any issues with your meta tags and offers recommendations for improvement.


By utilizing these free tools, you can effectively add, optimize, and check your meta tags to enhance your website’s SEO potential and improve visibility in search engine results.

Common Meta Tag Mistakes to Avoid

Ignoring Meta Tag Optimization: One of the most common mistakes people make with meta tag optimization is not realizing how important it is. 


Some website owners might not realize how important meta tags are for SEO and forget to improve them properly. 


But meta tags are very important for telling search engines what a page is about and why it’s important. 


Website owners can greatly improve their site’s exposure and click-through rates in search engine results pages (SERPs) by filling meta tags with relevant keywords, catchy titles, and detailed descriptions. 


Not Using Unique Meta Tags: Another common mistake that can hurt SEO is using the same meta tags on multiple pages of a website. 


Meta tags should be different for each page on a website based on its content and keywords. Search engine crawlers can get confused by duplicate meta tags, which can make individual pages less relevant and possibly lower in rankings and exposure. 


Website owners should ensure that each page has its own meta titles, descriptions, and keywords to maximize SEO and improve organic search results. 


C. Not Making Regular Updates to Meta Tags: Meta tags are not “set it and forget it” parts of a website; they need to be updated and optimized on a regular basis to keep working well. 


If you don’t regularly update your meta tags, search engine results may show old or useless information, which hurts user experience and click-through rates. 


As website goals and content change, it’s important to go back and change the meta tags to reflect the most up-to-date information and improve SEO performance over time. 


It is important to check and update meta tags on a regular basis to get the most out of SEO and make sure that your site stays visible and relevant in search results.

Future Trends in Meta Tag Optimization

Evolving Role of Meta Tags in SEO

Meta tags’ role in SEO is likely to change as well, since search engines are always improving their algorithms and users’ habits change. 


Meta tags have been an important part of on-page optimization for a long time, but their importance may change as new technologies and trends come out.


As artificial intelligence, natural language processing, and semantic search improve, search engines are getting better at reading and understanding web material in ways other than meta tags. 


This change may affect how meta tags are used in search engine results and what kinds of information are thought to be useful for optimization. 


Predictions for Meta Tag Innovation

Looking ahead, we can see meta tag optimization innovations that take advantage of new technologies and adapt to changing search engine algorithms. One new idea for meta tags is to add structured data markup straight to them. 


This will give search engines more information and help people understand them better. 


Also, progress in machine learning and predictive analytics might make it possible for meta tag optimization methods to be more dynamic and personalized for each user and search query. 


Voice search and other alternate search methods are becoming more popular. As a result, meta tags may change to adapt to these new ways of interacting, such as making them better for voice search queries and virtual assistants. 


Adapting Strategies for Future Meta Tag Trends

To stay on top of new meta tag trends, website owners and SEO experts need to change how they optimize their sites to adapt to new ideas and search engine algorithm changes. 


This could mean keeping up with new technologies and the best ways to optimize meta tags, trying out new methods, and constantly checking and changing meta tags to keep up with changing SEO trends. 


To get the most out of SEO in the future, it will also be important to keep an all-around view of on-page optimization, including things like structured data markup and user experience optimization in addition to standard meta tags. 


Website owners can make their sites more visible and competitive in search engine results by being flexible and quick to respond to changes in meta tags.

Conclusion

Even though search engine optimization (SEO) is always changing, meta tags are still one of the most important ways to make a website more visible and get the most out of SEO. 


It’s impossible to say enough about how important meta tags are. They help you make interesting meta titles and descriptions, use structured data markup, and keep up with new trends like voice search optimization.


Website owners can make their pages more visible to search engines and more interesting to users by learning how meta tags work and what information they send to search engines and users. 


Finding out about new meta tag optimization techniques and staying up to date on best practices will be important for getting ahead of the competition and having long-term success in the ever-changing world of SEO. 


Using meta tags correctly is important for getting your website to work at its best and getting steady free traffic, no matter how experienced you are with SEO or how new you are to the field.

Frequently Asked Questions

To write compelling meta descriptions, focus on being concise, descriptive, and engaging. Include relevant keywords, provide a clear summary of the page's content, and entice users to click through to your website.

Meta keywords are no longer relevant for SEO in 2024. Search engines like Google have deprecated their use due to abuse and manipulation, focusing instead on other factors like content relevance and quality.

You can check if your meta tags are implemented correctly using tools like Google Search Console, MozBar, or SEOptimer. These tools allow you to analyze your website's metadata and identify any issues or errors that may affect SEO performance.

Neglecting meta tag optimization can result in decreased search engine visibility, lower click-through rates, and diminished user engagement. Without properly optimized meta tags, search engines may struggle to understand the content of your webpages, leading to lower rankings in search results.

To use meta tags for SEO, ensure that each page on your website has unique and relevant meta titles, descriptions, and other metadata. Incorporate targeted keywords naturally into your meta tags and provide accurate and informative summaries of your page content.

To create meta tags for SEO, start by identifying relevant keywords for each webpage. Craft unique meta titles and descriptions that accurately reflect the content of the page and incorporate the chosen keywords strategically.

Meta tags for SEO are HTML elements that provide metadata about a webpage's content to search engines. They typically include meta titles, meta descriptions, meta keywords, and other attributes that help search engines understand and index the content of a webpage.

There is no specific limit to the number of meta tags in SEO. However, it's essential to focus on quality over quantity and ensure that each meta tag is relevant, descriptive, and optimized for search engines.

Meta tag keywords for SEO are a type of meta tag that used to specify keywords relevant to the content of a webpage. However, they are no longer relevant for SEO in 2024, as search engines like Google no longer consider them in their ranking algorithms.

To write a meta title for SEO, include relevant keywords at the beginning, keep it concise (around 50-60 characters), and make it compelling to entice users to click through to your website from search engine results pages.